Rusty Olds Update

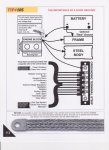
With the painted surfaces, suggestion is to use a grounding strip, aka bus bar or terminal strip, for grounds in the engine area and other common areas where grounds are needed.
That way one doesn't have to strip paint off to get a good metal to metal ground.
The plus side is you get common ground areas for easier tracing if there's a problem.

Click on thumbnail to enlarge.
Grounds.jpeg
 
Last edited:
I’m note bad at wiring Bash, I have reasonable patience. I’ll just start, trace the wires and I’ll find the issues eventually.

Buss bars are a good idea and the car does have a couple already, I’ll trace and find the issues. Thanks for the suggestion.
 
Last edited:
Well I spent some time on the weekend tracing wires. I’ve solved one problem and found some info on another problem but not solved yet.

I’ve solved the power to the “power top” switch and now the actuators work as published. Regarding the Oil light being ON after engine off, I have discovered that there is a phantom 3V sitting on the ignition circuit with the key turned off. I’ve checked the switch and that is not faulty so is not the cause (the 3V is there with the ignition circuit disconnected from the switch). I’ve removed all the ignition fuses and the voltage is still there so is not feeding back from any particular circuit. I’m away again this week so will try a bit more next weekend.
 
Well I spent some time on the weekend trying to sort the electrical issues. So I started the weekend with 6 electrical issues and finished with 2 so I guess that is progress, though it doesn’t feel like it.

I still have 3 volts sitting on the ignition circuit, even after every fuse and relay is removed from the car. I have a couple more ideas to look at yet so haven’t given up. The other issue is the fuel gauge which has gone from bad to worse. It was flickering all over the place but now has given up the ghost altogether. I guess that makes it easier to fault find.

Just to make me feel like some progress was made I did fit the outer door handles Sunday afternoon. Woohoo, progress eh.
 
If you haven't already, disconnect the alternator and check for the 3 volt draw. I have a draw on one of my cars and it turned out to be a shorted diode in a brand new alternator.

Ah you have it in one, thanks for the tip. Yep a shorted diode causing the 3 volts to feed back to the ignition circuit. Unplug the alternator and it disappears instantly. I’ll just fit another diode and all will be good.

Only one more to find now, a fuel gauge that doesn’t want to play properly.
 
Just an update for you all.

Not a great deal of progress these last few months but I have sorted the fuel gauge out. So that works fine now. This last week I’ve been working on the windows. They have been fighting with me all the way, getting the frames in just the right spot has tried my patience for sure. Anyway I’ve now got them all sorted and have all the side windows fitted. Small progress but progress all the same. Here is a picture.

5B8834D0-4914-4B13-B6E5-3AF6AA4E009C.jpeg
 
Just an update for you all.

Not a great deal of progress these last few months but I have sorted the fuel gauge out. So that works fine now. This last week I’ve been working on the windows. They have been fighting with me all the way, getting the frames in just the right spot has tried my patience for sure. Anyway I’ve now got them all sorted and have all the side windows fitted. Small progress but progress all the same. Here is a picture.

View attachment 2351
Fine looking automobile. Great Job!
 
Looks great Gary, hardtop and convertable window fitment can be soooo frustrating indeed! I feel your pain mate!
 
Hi Keith, yeah I did a post to my Facebook page too so she is up to date. Oh that reminds me, I should do the same on the Canadian Rodder FB page too.
 
Ok well this week I’ve fitted the belt line trim, it took a bit of doin. The new clips came with screws to install, no problem. However when I’d installed the clips I couldn’t get the trim to go on, yet I could fit a clip to the trim on the bench no problem. What the? Well turns out that the screw heads were too broad and were spreading the plastic clip. No shop handy to get replacements so I ground down each screw then painted them. Fitted all the clips and like magic the trim pieces now go on, eureka!

Also fitted the glovebox and radio delete panel (headlight and wiper switches where the radio knobs would be).

No pictures at the moment, I’ll get some later.
 
OK time for pictures. Note that I've also installed the hood trim pieces. A bit time consuming but I got there.

Dash - radio delete fitted and glovebox fitted.

IMG_1083.JPG


Belt Line trim fitted

IMG_1094.JPG


Hood Trim pieces fitted

IMG_1093.JPG


IMG_1092.JPG


Wont be touching it for a week or so, I've got other things that need doing. Stuff always gets in the way doesn't it.

Thanks for looking