Nice work

Navigation
Install the app
How to install the app on iOS
Follow along with the video below to see how to install our site as a web app on your home screen.

Note: This feature currently requires accessing the site using the built-in Safari browser.
More options
You are using an out of date browser. It may not display this or other websites correctly.
You should upgrade or use an alternative browser.
You should upgrade or use an alternative browser.
The "Spaghetti Western". (a.k.a. BB re-wire project)
- Thread starter 351CFalcon
- Start date
Got the switches and knobs all installed.
As well installed one more ground.
Had a discussion on Friday with the Tech Dept at AAW in regards to my electric fan set up.
They suggested I install a ground wire to the Relay Out GRND on the fuse panel even though the fan motor has a ground to the chassis.
The Relay Out GRND goes to the interior bus bar, which in turn is grounded to the chasis.
All the interior grounds have a common ground, most of them as there is one on the control box for the fuel gauge.
Click on photo to enlarge
Attachments
Last edited:
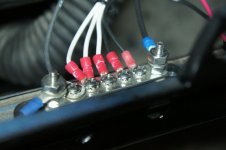
Time to start putting the dash back together.
Checked all the connections on the fuse panel, control box and grounding strips to ensure they are tight.
the nice item about the gauge installation is it only involves a Cat5e cable connection from the gauge to the control box.
First will be the clock.
Click on photos to enlarge.
Checked all the connections on the fuse panel, control box and grounding strips to ensure they are tight.
the nice item about the gauge installation is it only involves a Cat5e cable connection from the gauge to the control box.
First will be the clock.
Click on photos to enlarge.
Attachments
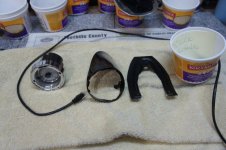
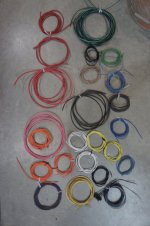
The left overs.....
It's been a little while.
Gauges and clock are installed.
Thought it would go through the left over pile, keep some, throw some and put some into the Swap Meet pile.
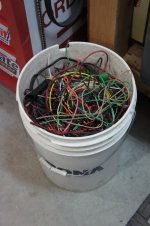
First photo is a bucket of the old harness, tape, braid cover ext.
AAW doesn't cheap out on giving you wire.
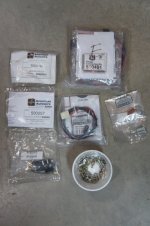
Second photo is what I didn't use in the whole kit which includes one package for the gauge harness.
It's for any aftermarket gauge manufacturer EXCEPT the one I chose - Dakota Digital.
Oh, I did raid a few wires for my own purposes.
I have a one wire alternator, hence didn't use the alternator kit they include.
The brake switch was too short and decided to keep the existing heater switches as they came with the Vintage Air system.
The other minor little stuff is terminals. AAW uses OEM terminals and I converted them to the solder less insulated style only because one can not find the super rare GM technicians terminal crimper.")
The third photo is of the left over wiring.
I will keep it and box it with the other '52 parts that will go with Black Betty when I sell her.
They also give you three or four unmarked wires to use for other power items such as antenna, windows, mirrors or locks.
Click on photos to enlarge
It's been a little while.
Gauges and clock are installed.
Thought it would go through the left over pile, keep some, throw some and put some into the Swap Meet pile.
First photo is a bucket of the old harness, tape, braid cover ext.
AAW doesn't cheap out on giving you wire.
Second photo is what I didn't use in the whole kit which includes one package for the gauge harness.
It's for any aftermarket gauge manufacturer EXCEPT the one I chose - Dakota Digital.
Oh, I did raid a few wires for my own purposes.
I have a one wire alternator, hence didn't use the alternator kit they include.
The brake switch was too short and decided to keep the existing heater switches as they came with the Vintage Air system.
The other minor little stuff is terminals. AAW uses OEM terminals and I converted them to the solder less insulated style only because one can not find the super rare GM technicians terminal crimper.
The third photo is of the left over wiring.
I will keep it and box it with the other '52 parts that will go with Black Betty when I sell her.
They also give you three or four unmarked wires to use for other power items such as antenna, windows, mirrors or locks.
Click on photos to enlarge
Attachments
Good to see that they didn’t leave you short, or the “just enough” principle (which normally means that you end up 2mm too short.
Being a "universal" kit, it was designed so that the fuse panel could be located anywhere under the dash (traditionally left or right) or under the front seat, hence the lengthy wires.Good to see that they didn’t leave you short, or the “just enough” principle (which normally means that you end up 2mm too short.
I wish ford had given me that option ...Being a "universal" kit, it was designed so that the fuse panel could be located anywhere under the dash (traditionally left or right) or under the front seat, hence the lengthy wires.
Attachments

Wow....where do you even start.....I wish ford had given me that option ...
Crikey....the Spaghetti Western Part 2.....
Here piggy, piggy.....
Just an interesting task to remove the headlight buckets to replace the pig tails.
Took the front wheels off the wheel cribs and jacked it up so that I'm able to sort of get in there to work.
Even with the wheel turned to open up the area even more, it still was a little difficult to get to two screws.
Yes, it would have been better to remove the wheel/tire but I like "challenges".
As alluded too in an earlier post, with French headlights, the buckets get installed on the back side of the fender.
While the drivers side headlight bucket was out, noticed the shop didn't re-paint the area re the new welds.
Another task.
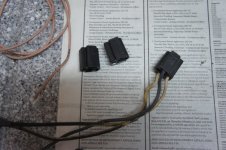
The previous wiring harness was an old Painless, so the pig tails were made up.
So instead of trying to track down a couple of old style pig tails at the auto parts stores,
I will make them up as I have all the necessary parts and wires.
click on photos to enlarge.
Just an interesting task to remove the headlight buckets to replace the pig tails.
Took the front wheels off the wheel cribs and jacked it up so that I'm able to sort of get in there to work.
Even with the wheel turned to open up the area even more, it still was a little difficult to get to two screws.
Yes, it would have been better to remove the wheel/tire but I like "challenges".
As alluded too in an earlier post, with French headlights, the buckets get installed on the back side of the fender.
While the drivers side headlight bucket was out, noticed the shop didn't re-paint the area re the new welds.
Another task.
The previous wiring harness was an old Painless, so the pig tails were made up.
So instead of trying to track down a couple of old style pig tails at the auto parts stores,
I will make them up as I have all the necessary parts and wires.
click on photos to enlarge.
Attachments
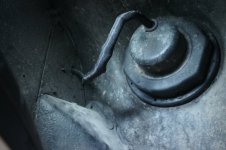
When I was taking my headlight buckets out the wires and were the wires entered the bucket was a mess. Wires were chewed and dirt and grime on everything. When I put it back together I went and got braided stainless steel plumbing lines. I used the 13 inchers. they had threads on the ends that I screwed into the buckets and the other end went into the front splash aprons. Wire runs through and is safe and dry. And if you are ever laying on your back under my fender it looks amazing for the $10 I spent for both sides...just a clean idea..
Do you have any photos of it? thx.
If I can get my iPad in there without taking my front tire off I will get some pictures tomorrow
No need to take the front tire off.If I can get my iPad in there without taking my front tire off I will get some pictures tomorrow
Little bit embarrassed..I looked underneath and everything was painted black. I tried to take a picture but it was just black. I put a work light up in there but I couldn’t get the ipad to focus right. The thing I don’t understand is why its painted. Somewhere somehow I painted it with that por stuff. I don’t remember when or even why I did it. I put that stuff in 12 years ago but for the life of me I don’t remember painting it...and at the back of the light pod it looks like I cut the fitting off and put some other kind of fitting. If you run your finger nail on the hose you can feel the braided steel but I’ll be damned if I know why I painted it. I’m not going to give up on the pictures though..sooner or latter I will have that tire off and I should be able to crawl right in there and get a good picture and hopefully get some definition on the blacks. Sorry....
Hey, no need to go to all that work for an all "black" photo.Little bit embarrassed..I looked underneath and everything was painted black. I tried to take a picture but it was just black. I put a work light up in there but I couldn’t get the ipad to focus right. The thing I don’t understand is why its painted. Somewhere somehow I painted it with that por stuff. I don’t remember when or even why I did it. I put that stuff in 12 years ago but for the life of me I don’t remember painting it...and at the back of the light pod it looks like I cut the fitting off and put some other kind of fitting. If you run your finger nail on the hose you can feel the braided steel but I’ll be damned if I know why I painted it. I’m not going to give up on the pictures though..sooner or latter I will have that tire off and I should be able to crawl right in there and get a good picture and hopefully get some definition on the blacks. Sorry....
I can picture it in my mind, as I still have one I think, but there are days....
I'm going to encase the headlight wires in a braid covering which should give some protection against the dirt and grime.
Plus I'm installing double plug connectors in the area for quick disconnects if I have to replace the light.
So must have access.
Your idea is good though, nothing wrong with it.
AN UPDATE:
Looking through the Chev's of the 40's catalogue, I see they have a similar Stainless Steel braided line set up for sale.
Last edited:
Finally...and I do mean finally...
All the electrical work is now complete with this mornings effort on the headlight pigtails.
Good thing I changed them out to new versus mixing old and new.
Some paint required to clean up the surface rust on the outer edge of the buckets.
As well, had to install a "key-on" fused wire to the ACC terminal on the gauge control box for the voltmeter to work in the gauge.
Tomorrow's objective..
Start testing everything, providing the battery is charged.
I won't start the car until it's on the ground, and that is after the carpet, seat belts and interior gets re-installed.
Need to get under the car for the seat belt bolts and anchors.
click on photos to enlarge
Attachments
Last edited:
Woohoo, install finally done. Nice stuff. Keep a fire extinguisher handy when you test everything and fire it up.
very interesting Brian. Thanks for the great thread on re-wiring a car over the winter. One of the things that stood out to me a couple months back was how it appeared you took this project on. Working in heavy construction the last 18 years and then watching this thread, I can’t help but to think you had some experience as a project manager. Know what the outcome must be, create and get budget approvals, plan the steps including material allocation, have contingency plan(s), execute and take lots of notes! Lol
Thanks again for taking us along.
Greg
Thanks again for taking us along.
Greg
Create and get budget approvals....had to laugh when I seen that...no such thing as a approved budget when working on old cars..especially with covid prices...but yeah thanks for all of the posts....enjoyed them...so what’s next..top chop..suicide doors....we need reading material for the summer......