The "Spaghetti Western". (a.k.a. BB re-wire project)

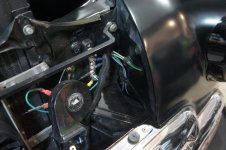
The only item requiring new wiring was the fuel sender and ground for it.
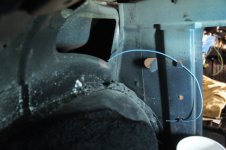
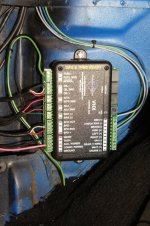
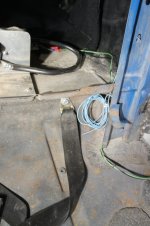
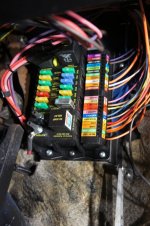
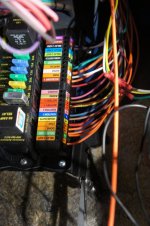
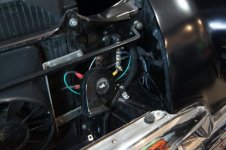
Time was spent today running the fuel sender and ground wire from the back to the control box.

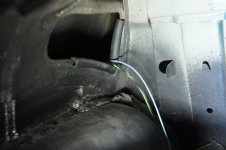
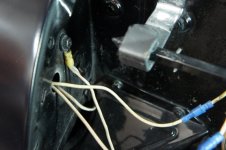
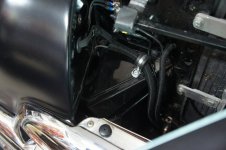
There was a sharp edge area in the trunk the wiring was going over that no doubt would have caused problems over time, so found some short pieces of power brake booster hose and split them to cover that edge.

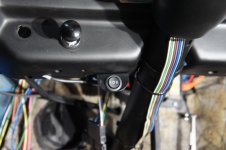
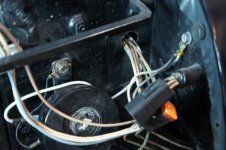
Cleaned up all the rear wiring under the carpet with cable ties, which took a while and a whole lot of ties too so not too much got done as planned.

Click on photos to enlarge

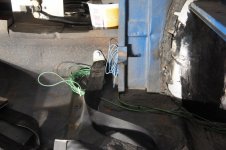
UPDATE: I'm not enamoured with this route, however after investigating other possible routes, its the best without going all the way around the wheel well and back to the sender which creates lots of wire.
 

Attachments

  • 49F69AD8-1063-49E1-9827-EFD19D5FCDAD.jpeg
    49F69AD8-1063-49E1-9827-EFD19D5FCDAD.jpeg
    59.9 KB · Views: 59
  • 8207547E-F865-4B6A-A7BA-276F0F30E72F.jpeg
    8207547E-F865-4B6A-A7BA-276F0F30E72F.jpeg
    60.5 KB · Views: 61
Last edited:
It was a good day....

Gauge control box completely wired.
Ran five new wires to replace some of the old harness.
Took apart some of the Gauge harnesses in Step D not being used to extend some wiring.

The adjustment control switch installed too.
And more cable ties installed now that is complete.

Click on photos to enlarge
 

Attachments

  • 51394B32-4FEE-4075-861C-3645B9943B7B.jpeg
    51394B32-4FEE-4075-861C-3645B9943B7B.jpeg
    120.9 KB · Views: 60
  • B371F912-2810-45DE-828E-36C663CE646A.jpeg
    B371F912-2810-45DE-828E-36C663CE646A.jpeg
    59.7 KB · Views: 55
Last edited:
The last Step standing...

Step F - the accessory section, which is the real meat and potatoes of all the other steps.
This step includes:
electric choke
radio
wiper motor/switch
heater motor/switch
horn(s)
electric fan(s)

Plus I've added:
electric transmission kick-down
power outlet
clock

And it would include other power accessories such as PW, PL, PA, etc if that accessory kit to Step E was also ordered.

As alluded to in another post one can not complain over the lack of wire, refer to photo.
Most of the above items are relatively close to the fuse panel, hence wastage will be high in this case.

I don't plan to manhandle all this wire at once, instead will be removing each wire from the "mess" as needed.

click on photo to enlarge
 

Attachments

  • 6655E323-253C-441F-8B1B-C117104A4CC8.jpeg
    6655E323-253C-441F-8B1B-C117104A4CC8.jpeg
    93.4 KB · Views: 57
Last edited:
Did more thinking and looking in regards to the fuel sender & ground wire plus the third brake light wiring route.

Found a spot that seems to work, so out came the drill and step drill to open it up for a grommet.
Then re-routed both with the third brake light wire going to underneath in the middle of the package tray for hook up (which I plan NOT to do).

Fished out the wiring for the radio (2 wires), heater and wiper hook ups.
Got the radio and heater done. The heater switch was mis-wired.
Wiper switch wiring is being worked on as three wires need extending now since I've moved it.

Also routed the back up light wire through the trunk and left it rolled up under the back seat.
It has to go to the transmission mounted switch and there is a grommet nearby to take the wire along the chassis.

Click on photos to enlarge.
 

Attachments

  • 8207547E-F865-4B6A-A7BA-276F0F30E72F.jpeg
    8207547E-F865-4B6A-A7BA-276F0F30E72F.jpeg
    60.5 KB · Views: 57
  • 49CF9E6E-31E1-4DA8-9C20-A5702D99BE04.jpeg
    49CF9E6E-31E1-4DA8-9C20-A5702D99BE04.jpeg
    80.1 KB · Views: 55
  • 5E8AF128-6D0F-40EA-9FC0-94E892BD842C.jpeg
    5E8AF128-6D0F-40EA-9FC0-94E892BD842C.jpeg
    80.4 KB · Views: 56
Another good day...

Started early today as yesterday was lost to "life gets in the way at times".

Lots done and a few re-dos, plus snipped a wire while crimping a terminal.
The list:
electric choke
electric kick-down
wipers
Electric fan
horn partially

Re-did the glove box light

Not much left:
power outlet
clock
three grounds

Once done, then re-check all the connections and cable tie galore plus install braiding in engine compartment.

Fuse panel is getting filled up.

click on photo to enlarge
 

Attachments

  • 56E68F6F-50D1-4552-B5CE-2B74AFAACF14.jpeg
    56E68F6F-50D1-4552-B5CE-2B74AFAACF14.jpeg
    102.3 KB · Views: 65
Last edited:
Progress again...
The three chassis grounds are now complete, as is the power outlet.
The clock power is wired to the fuse panel but waiting for the clock to be installed.
Did a little re-routing again to hide a bunch of wiring on the passenger side.

The only item waiting is the horn connection.
It never worked from the steering column so I had installed a horn button under the dash.
Contemplating that again but no rush at the moment.

The steering column pin connectors are not locking together and keep coming apart..
After investigation, there is a slight difference between the new harness pin connector and the old steering column one.
A slight difference but its prevents them from locking.
The kit did come with the new style, so now must remove the pin terminals from the steering column one and transfer to the new one.

I'm planning on painting the dash a few more coats again, so gauges, the clock and dash grille waterfall will not be installed until after.

Plus I also plan to re-check all the connections before firing up the system

No pics, forgot the camera.
 
Last edited:
It's wired!

Yuppers, all the wiring is done.

Had a bitch of a time with the horn button, screws too small to hold 14AWG wire,: found some bigger screws to hold the wires.

Steering column pin terminals switched over to the new connector.
Side by side comparison shows quite some difference between the old (left) and the new.

I have a 36-piece pin removal tool, none of them would work; found a very small blade screw driver it worked excellent.

Gauges and clock is an easy install as only a Cat5 Cable from the control box to them; however installation is a later date re access to cable tie the wires..

The big project now is to go through an cable tie everything under the dash and maybe install the braid covering in the engine area, however, still have to change out the headlight pig tails but have to get the car on the ground to turn the wheels to work in that area, so really can't do that until the pig tails are done.

click on photos to enlarge
 

Attachments

  • 17DFD4B6-1DB7-49FA-AC64-794CDC79C496.jpeg
    17DFD4B6-1DB7-49FA-AC64-794CDC79C496.jpeg
    74 KB · Views: 69
  • A3DD61EE-4D6D-4664-B217-508036845886.jpeg
    A3DD61EE-4D6D-4664-B217-508036845886.jpeg
    96.4 KB · Views: 70
Spent some time installing cable ties on everything in the trunk, interior and under the dash.
Wiring is hidden from sight and most of it runs across the underneath of the top dash.

Got the drivers side defroster tube installed after many years of just "hanging" there. Never hooked up.

Nothing done in the engine area as waiting to get Black Betty down to earth, then I can turn the tires to access the headlight pig tails.
 
Looks like you are nearly there and should be firing it up soon. Check everything first of course.
 
Fought for a good portion of the afternoon trying to install a braid cover around three wires at the back of the engine.
Too much stuff in the way and two tight to get two hands into the area.
Gave up and then tied them up instead, even then that was getting frustrating too.
Two wires were shortened too.
Engine compartment getting back to norm, air cleaner is back on.

Have two areas needing braid covering and that will done soon, hopefully will be easier..
 
Progress made...

Didn't like the way the headlight wiring was going to work out so changed it.
Much "cleaner-looking" now. All the connections will be hidden.
However, have to wait until the car is down to earth to be able to turn the tires to work in the headlight area.

Got the other three braid coverings installed.

Engine area is now completed.

Back to the interior.
 
See.....

First two the original mess, then a revision (3rd photo) from what I originally did, sorry no photo of that mess, and a final improvement (last two photos).
 

Attachments

  • 6196AEC2-FE52-4B19-AA9F-87C5AAAFC988.jpeg
    6196AEC2-FE52-4B19-AA9F-87C5AAAFC988.jpeg
    61.5 KB · Views: 74
  • B6CD2098-5671-496E-8A5D-A59B426FC629.jpeg
    B6CD2098-5671-496E-8A5D-A59B426FC629.jpeg
    73.6 KB · Views: 70
  • 60EEF091-0431-4BE9-B82D-9C0DB154F90F.jpeg
    60EEF091-0431-4BE9-B82D-9C0DB154F90F.jpeg
    77.6 KB · Views: 77
  • 6175CDB9-7402-4D7B-9FDC-BD72413DF43A.jpeg
    6175CDB9-7402-4D7B-9FDC-BD72413DF43A.jpeg
    71.1 KB · Views: 52
  • 62FCAD09-099F-4836-89B2-ECEEEA1B00FF.jpeg
    62FCAD09-099F-4836-89B2-ECEEEA1B00FF.jpeg
    69.2 KB · Views: 55
Last edited: