The "Spaghetti Western". (a.k.a. BB re-wire project)

351CFalcon

Well-Known Member
Supporting Member
(decided to start a project thread as it's tirning into a major production).

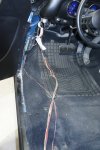
This is why I'm replacing the entire wiring harness.

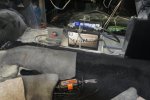
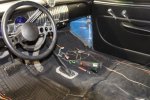
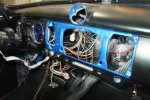
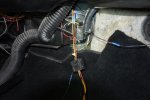
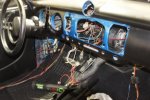
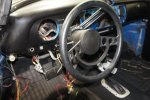
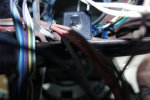
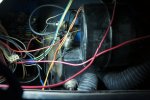
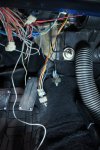
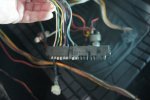
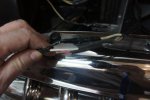
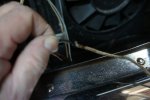
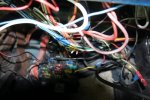
Somewhat newer pre-wired fuse panel, old style in that the wires are colour coded versus stamped with the circuit name, lots of wiring not used or going anywhere and some of it truncated improperly, some of it "live", some new wires joined to the old wiring harness that's still in the car.

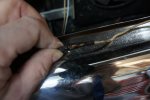
Even one defroster tube was not hooked up to the duct.

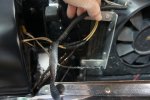
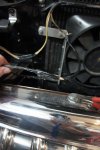
Also, while its look neatly done, the headlight and parking light wiring for the passenger side was routed through a rad support bracket, one would have to cut the wiring to remove the rad support bracket.

All not good.

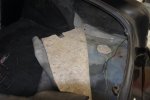
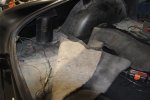
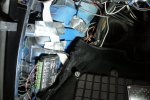
Raised BB up onto the wheel cribs, which were reduced from 15 inches high to 10.5 inches high.
Floor Jack is only capable of a 21 inch lift, so front end took two lifts to get the tires high enough for the cribs to slip underneath them.
Cribs help to work under the dash and to work under the car for a couple of items.
The battery is in the trunk, so planning to upgrade the cables to 1 guage as well as replace the TH400 transmission mount neutral safety switch.

Click on photos to enlarge.
 

Attachments

  • 494F3ED5-B717-454D-BD81-F72F10E58876.jpeg
    494F3ED5-B717-454D-BD81-F72F10E58876.jpeg
    74.1 KB · Views: 84
  • 55DB6557-863B-4FB3-9B6F-D06C1CE06F32.jpeg
    55DB6557-863B-4FB3-9B6F-D06C1CE06F32.jpeg
    95.6 KB · Views: 84
  • DCE12947-D91B-4AB8-95EA-1BF77566397A.jpeg
    DCE12947-D91B-4AB8-95EA-1BF77566397A.jpeg
    100.8 KB · Views: 88
  • B2FA9403-E875-46BE-9DD6-A112FA69B1DB.jpeg
    B2FA9403-E875-46BE-9DD6-A112FA69B1DB.jpeg
    72.4 KB · Views: 94
Last edited:
While waiting for the new harness, switches and related parts to arrive, have been taking out the interior for ease of installation.

Started with the trunk area first and worked my way into the interior.

It was a good time to check the trunk floor too for any soft spots.

Its is solid, all though the patching and welding is not the best, it will suffice. for now.

Some wires and equipment has been removed over the last several years, i.e. flame throwers equipment and wiring, hence not much is left.

However, there are more wires going into the trunk versuses whats in the trunk, must be lots of truncated wiring behind the wheel housing.

Click on photos to enlarge.
 

Attachments

  • C14B1411-A97D-40B6-8AE7-D6248D58831E.jpeg
    C14B1411-A97D-40B6-8AE7-D6248D58831E.jpeg
    76 KB · Views: 80
  • 00388C6D-5236-4372-9170-A663A426D814.jpeg
    00388C6D-5236-4372-9170-A663A426D814.jpeg
    63.4 KB · Views: 81
  • BB66519C-E37B-4A66-9955-2930335618A9.jpeg
    BB66519C-E37B-4A66-9955-2930335618A9.jpeg
    75 KB · Views: 81
  • D187C50D-CA61-4682-B097-D4F373EF06E3.jpeg
    D187C50D-CA61-4682-B097-D4F373EF06E3.jpeg
    87.3 KB · Views: 82
I'm sure you've thought this through, but I'll chime in anyway. Include all the wires in your rear harness that might not be needed now, but may be wanted down the road. Such as for trailer plug, backup lights, trunk latch, speakers, power antenna, fuel pump, backup camera, third brake light, etc.
 
I'm sure you've thought this through, but I'll chime in anyway. Include all the wires in your rear harness that might not be needed now, but may be wanted down the road. Such as for trailer plug, backup lights, trunk latch, speakers, power antenna, fuel pump, backup camera, third brake light, etc.


I've been thinking about it.
May just leave the extra wires coiled up both in the trunk and under the back seat for the next owner if they wish to do any of that.
Trying to keep the fuse panel to just what I need in order to keep the wiring under the dash minimal somewhat.
 
On my previous builds I just left the extra wires in the loom along with the rear lighting wires with a tag noting as such taped to the loom what was in there.
The guy that bought my rat rig wanted to put a third brake light on the tail gate and was overjoyed when he found it already wired in the rear harness.
 
It's been a fun time taking the interior apart and finding surprises.

Once the back and front seat were out, took off the ashtray panels which are unique to hardtops and 'verts.
Behind the passenger side panel was a pile of speaker wires, as apparently, there were two other speakers in the car at one time.
The other speakers were built into the ash tray panels.

Floor under the back seat is solid, no soft spots.

Had to untangle the mess under the glove box to get all the speakers wires separtated.

The other surprise was the wiring for the dome lights.
No door jamb switches for them to work, which I knew about, however one side was bare and live, the other side taped up.

click on photos to enlarge.
 

Attachments

  • 0C9276CF-12F3-4840-AF9D-B4FDA9920A25.jpeg
    0C9276CF-12F3-4840-AF9D-B4FDA9920A25.jpeg
    77.7 KB · Views: 74
  • 8373C97A-A1E0-4DDE-9CAE-B5DB88FD2CC1.jpeg
    8373C97A-A1E0-4DDE-9CAE-B5DB88FD2CC1.jpeg
    90.2 KB · Views: 76
  • EBF712E7-FA6F-4F89-9E9E-B768F32A518A.jpeg
    EBF712E7-FA6F-4F89-9E9E-B768F32A518A.jpeg
    64.8 KB · Views: 80
Last edited:
My back seat panels had ashtrays in them...unfortunately someone over the years learned that they could be pulled out and there was a large space in there....and they proceeded to fill it with candy and bubble gum wrappers and all kinds of garbage..
 
The other surprise was the wiring for the dome lights. No door jamb switches for them to work, which I knew about, however one side was bare and live, the other side taped up.

Most dome / interior lights work that way and switch on the ground side, either by the door switches or the headlight switch which also grounds to complete the circuit. (maybe)
 
After removing a few switches and having a good look while doing that, I find that the previous owners attempt to paint the dash somewhat with just masking off everything was done poorly. Paint job is not bad, just the masking as the blue could be seen at times.
As well, the roll under part of the dash was not painted.

Therefore decided to re-paint the dash by removing everything. It will be two-tone: satin clear on the bottom half and gloss clear on the top.

In the process of removing all the tie wraps and coverings, found three grounds that I was unaware of.
To ensure good grounds, as many in the interior were on painted surfaces, not bare metal, I plan to use grounding terminals/bus bars with them being connected bzck to the engine block.

Click on photos to enlarge.
 

Attachments

  • 6AD98EE0-60B3-4E31-9B82-719FFA486EB5.jpeg
    6AD98EE0-60B3-4E31-9B82-719FFA486EB5.jpeg
    91.9 KB · Views: 87
  • 71FAEB32-72A6-4148-BD44-93F9F3FDD993.jpeg
    71FAEB32-72A6-4148-BD44-93F9F3FDD993.jpeg
    75.4 KB · Views: 79
Just a thought. You might want to rethink the gloss black on your dash, or reverse the gloss and satin areas. I would be worried about sun glare off the top of the dash. My old boss/mentor used to paint his dashes in satin for that reason. I did mine in gloss and while in general it is no issue, at times it can almost be blinding. I think yours would be worse being larger, more horizontal and in gloss black.
 
Just a thought. You might want to rethink the gloss black on your dash, or reverse the gloss and satin areas. I would be worried about sun glare off the top of the dash. My old boss/mentor used to paint his dashes in satin for that reason. I did mine in gloss and while in general it is no issue, at times it can almost be blinding. I think yours would be worse being larger, more horizontal and in gloss black.

Good point Scotty.
The interior door rails (garnishes) are gloss black, hence the resson for the top of the dash in gloss black..
I have found that a glossy surface is somewhat easier to keep clean.
Will re-think it all.
 
I have been spending about an hour to an hour and half per day most days going through the interior wiring.

It's been a long process, I have finally got most items taken apart.
I don't know how anyone could get there hands in some areas to install cable ties but they did, had a hell of a time getting just one hand into those areas to cut them.

Finally all the under the dash wiring is "loose".
I had to drill out the air vent knob brackerts screws..
After 68 years and even with lots of liquid wrench, the screws would not budge.
One retainer nut on the wiper switch was jammed on, and had to drill that off carefully too.

Found the hidden switch for the flame throwers. It was under, up and back in the dash.
Again, don't know how somebody got the nuts on the bolts to hold it but they did and they used loctite.
Had to use a small pry bar to jam the nut to get the bolt loose.
The equipment for the flame throwers that was in the trunk was removed over the last few years.

Next step is to go through the wiring to see what will be retained.
And then onto the engine compartment.

Click on photos to enlarge.
 

Attachments

  • F5C8C4B4-176A-41CC-BD28-1E036E91FAB3.jpeg
    F5C8C4B4-176A-41CC-BD28-1E036E91FAB3.jpeg
    88.5 KB · Views: 66
  • BEA282B9-9CC4-45C5-B385-038409761034.jpeg
    BEA282B9-9CC4-45C5-B385-038409761034.jpeg
    75.4 KB · Views: 67
  • 343E33B9-10B6-4D8C-96AE-B91189B656B1.jpeg
    343E33B9-10B6-4D8C-96AE-B91189B656B1.jpeg
    56.8 KB · Views: 64
The dashes are a work of art in the 50s cars....it makes a statement....make the dash shinny and chrome every else...if it’s too bright in the sun...that’s why they make sunglasses...eh
 
Missed a few cable ties but now have the entire interior harness loose. and somewhat separated.

Taking notes of what is where and sometimes why did they do that, not that it really matters.

Even though I have ordered all new switches (head light, wiper, ignition, heater, power outlet), have decided to retain the existing heater controls.

The heater/defroster is an early model Vintage Air with 5 vacuum lines and several servo controls.
Hence the heater controls (two of them) are wired correctly with only one wire requred back to the fuse panel, which will be replaced.
If it ain't broken, why fix it.

The steering column was another matter, took apart the connection and found the terminals to be somewhat "oxidized".
It will be replaced totally with the new harness.

Will be moving into the engine compartment soon to remove all the wiring braids.

click on photos to enlarge.
 

Attachments

  • 4303C714-12F5-43D6-890A-C262A8DF7FC2.jpeg
    4303C714-12F5-43D6-890A-C262A8DF7FC2.jpeg
    72 KB · Views: 66
  • F2722598-98B8-40F4-BB1B-8D69080F2EED.jpeg
    F2722598-98B8-40F4-BB1B-8D69080F2EED.jpeg
    85.8 KB · Views: 67
  • C8D489CA-5CC6-4872-93E7-A87520BF5238.jpeg
    C8D489CA-5CC6-4872-93E7-A87520BF5238.jpeg
    48.4 KB · Views: 61
Took a break from the interior and decided to tackle the wiring in the engine bay.

Started with the paseenger side headlight area first.

Tape, tape and more tape.
Somebody had time or went overboard.
The wire covering was taped, then the wires in the cover were somewhat taped with even more tape on the joints.

Took awhile to undo it all and found some not so good soldering.

Click on photos to enlarge.
 

Attachments

  • F81487C3-6F57-4128-A89A-E461F063F73D.jpeg
    F81487C3-6F57-4128-A89A-E461F063F73D.jpeg
    69.1 KB · Views: 62
  • 4FB1F858-9B84-4842-ADF1-DD9B3DCA2B40.jpeg
    4FB1F858-9B84-4842-ADF1-DD9B3DCA2B40.jpeg
    67.6 KB · Views: 69
  • 945C1024-4D51-4667-8B42-184E83F7BC9F.jpeg
    945C1024-4D51-4667-8B42-184E83F7BC9F.jpeg
    54.6 KB · Views: 66
  • CC1D53D0-E32F-49D5-AB22-228DDA7099A8.jpeg
    CC1D53D0-E32F-49D5-AB22-228DDA7099A8.jpeg
    60.4 KB · Views: 68
  • 05FF6CD6-ACCA-4F0D-9100-E09FE44A468D.jpeg
    05FF6CD6-ACCA-4F0D-9100-E09FE44A468D.jpeg
    57.7 KB · Views: 74