
Navigation
Install the app
How to install the app on iOS
Follow along with the video below to see how to install our site as a web app on your home screen.

Note: This feature currently requires accessing the site using the built-in Safari browser.
More options
You are using an out of date browser. It may not display this or other websites correctly.
You should upgrade or use an alternative browser.
You should upgrade or use an alternative browser.
EBEARS 53 f100 build
- Thread starter EBEAR
- Start date

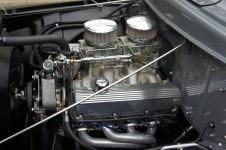
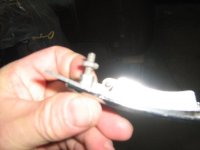
This was the set up I used in my F100.Again I'm not great with taking pics . I eliminated the factory air pump but of course just a shorter belt wouldn't work so I had to make an idler . It is amazing on how precise it has to be or it will run the belt off especially with the short distance . I tried using the ford power steering pump and for no explainable reason it boiled the oil . I started a thread of FTE and had allot of great input but no consensus . Because of the lack of info on the vette rack pressure requirements I decided to use a gm pump . The vette placement runs a reverse rotation pump and I wanted it to be in the factory 351w placement of standard rotation so inventing we go . Most of the gm cars seem to be right so I grabbed one from a fwd olds with the same rib pulley . Well no room for the reservoir type pump . Ok so can we make this into a remote reservoir using the vette remote ? Yes but again some manufacturing . I had to tap a fitting into the pump .
I used the A/C bracket with some modifications.
click on photo to enlarge.
Attachments
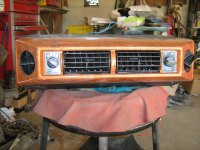
Due to very limited space in my shop and still actually trying to work for a living I decided that the only way there was going to be any winter progress was to put the cab in the corner with hopes of convincing myself to work on it . Seats , steering column , pedals and seat belts have been " roughed in " . Still in the budget build mode I purchased an underdash ac unit since I already had all of the underhood stuff . This meant that I needed the heater controls . The factory f100 had a little " ugly " bracket attached to the underside of the dash . So I set in search of a vintage style in dash mounted heater control unit that could be fitted . After numerous hours of interweb and combing through junkyards I came upon a 65 mustang unit that looked somewhat promising . Being that they are readily available aftermarket there was measurements available . They are designed to fit on a curved dash but the width was about right for the spot my ashtray was using . I didn't want to spend the big bucks on something I wasn't sure that would work for me so ebay it is . I found a reasonably priced used unit with the cables and heater switch so this should be perfect for testing without huge cost . As it turned out the uncleaned unit I got was in excellent condition once cleaned and with the swapping of one cable the appropriate cables reached . A little manufacturing of a curved plate to replace the ash tray was done .
Attachments
A win from this electronic view point! I like the look of that! Great eye for repurposing.
Greg
Greg
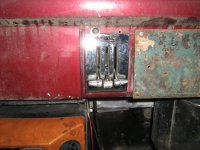
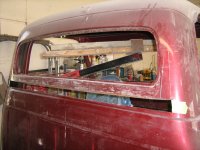
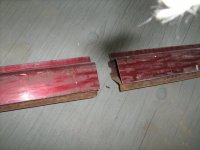
One of the things that I dislike about the 53-56 f100's is the small back window in relation to the front and side glass and the expanse of metal between the top of the box and the window bottom that this leaves . So a little mod to even things up . 2"s looked about right . I wanted it to follow the pillar angle not straight down .
Attachments
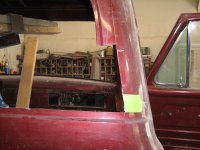
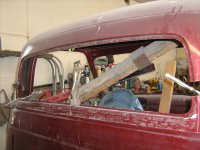
Of course it needs to get a little wider to keep the proper look . All in all this is a pretty straight forward mod . The inner brace came down accordingly with a little lengthening . Side gaps and center gap pieces made and welded in . PS still needs finish welding and metawork in this pic .


Attachments
Last edited:
One of my budget minded decisions was to try to utilize as much of the AC from my donors as possible , so I purchased a very budget underdash AC unit . The truck will not be winter driven but with experience gained from my coupe I knew that some heat for the cooler nights and keeping the windshield clear was a must . After some mockup it was clear the heater needed to be shrunk some . I don't particularly care for the fresh air vent on the outside of the truck but having fresh air makes it much easier to keep windows clear and since I filled the cowl vent and am illiminating the vent windows the thinking was to be able to use the heater fan bring in cool outside air for the marginal days . 


Do you happen to have a link?If it works decent I will likely stick with it . It only sticks a couple inches past the dash , eliminates allot of wiring and cost a whopping $ 80 new off ebay .
I bought the underdash 3 or 4 years ago on ebay if you like I can try to look for a make and model but at the time there were hundreds of choices .Do you happen to have a link?
Vintage Air now has an underdash retro model.
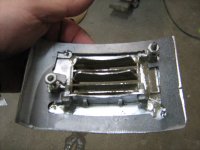
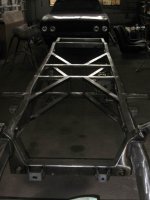
A small addition just to keep things going around here because my cars not ready to drive yet . lol The po had built a ridiculously heavy x frame which in all fairness made the frame very stiff as it should . But " and there always seems to be one " everything I tried to do seem to run into it . After having to raise the engine the long tube headers that had cleared nicely didn't . The exhaust was still doable but I have all stainless and it doesn't like being bent , the driveshaft needed a little clearanceing , fuel lines , brake lines and wiring needed to be finessed around it . I don't really remember what it was that broke the camels back but out she goes . Luckily it was still just tacked in not finish welded . 


As far as crossmembers the flatout c4 kit adds a heavy welded one in the front and two plus the actual diff in the rear so with the boxing strength will not really be an issue . So my decision is to wait until my next and " hopefully " final engine trans install to make a crossmember for the rear trany mount and some lateral support . Something along the lines of this " but only one lateral section " that will allow room for exhaust and everything else .
Attachments
Last edited:
A little slow on here so I'll add a little . Another one of my pet design flaw peaves is the drip rail . Understandably for function the roof drip rail slants rearward to drain water . This leaves the front side glass and corresponding frame deeper at the front than the rear , working against the general forward flow ( at least in my mind ) . So here begins the dilemma . I mostly do not care for these trucks when they have been chopped and I would like to avoid a cut windshield . So this leaves a limited amount of options especially considering I have a perfect dent free roof that I would hate to cut . After a few threads and many discussions on the subject on FTE I publicly announced that I needed to put the brakes on mods or the truck will never see the road . Well hmm the cab is just sitting there in my shop . Pic of a stock cab .

Yur funny . I guess I should point out this is all stuff that was done quite some time ago I'm just slowly updating to keep thing interesting . Stay tuned to find out what happened . LOLPlease don’t chop it. !