Looking the goods now.

Navigation
Install the app
How to install the app on iOS
Follow along with the video below to see how to install our site as a web app on your home screen.

Note: This feature currently requires accessing the site using the built-in Safari browser.
More options
You are using an out of date browser. It may not display this or other websites correctly.
You should upgrade or use an alternative browser.
You should upgrade or use an alternative browser.
1930 Model A Coupe
- Thread starter hooligan
- Start date
Well it’s been a while since I have been on, and a longer while getting a chance to work on the coupe but I have been chipping away here and there on it as I find some free time:
The car is now finally ready to be torn apart and and finish some welding and then paint the chassis and start on the body.
I was able to finish up the steering and put in a really sweet tilt column from lime works, the motor now is fairly close to being complete, brake and clutch are finished.
I don’t know that I’ll be able to have the body done in paint anytime soon so it may just go satin black with a gloss black chassis for now
Now to find a weekend to pull it all apart
Looking mighty fine! For a flat head... ") lol
lol
lolSlowly finding time to pick away at my project. I decided I better take the time to build a front flooring structure to replace what was originally two pieces of wood. I used the existing 3/4” lip from the original floor and used 3/4 x 3/4 x 1/16 tubing to fabricate the frame. I will build a lid that hinges to access the clutch and master cylinders after I skin the floor. Also finished fabricating the last body mounts and panhard mount.


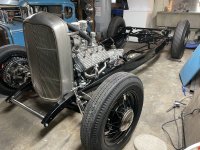
Pretty happy with how the rear and front sub frames turned out

I figured since the car is secured, now would be a good time to remove all the original body wood, I had already installed a new top kit but I haven’t done the body or a complete Model A body wood before.
Removing the old wood proved to be a bit of challenge regarding the A pillar posts, I removed all the nails and bolts and it just didn’t budge, I realized that when the car was original that the A pillar has a number of screws that go in the wood from behind the quarter panel, so Ford obviously installed all the wood before the sheet metal?? I ended up drilling a bunch of 1/2” holes down the Center of the old A pillar wood and prying it out that way, after I removed the screws that were installed from behind
I have the new body wood all cut to accommodate the chop amd stained
Will be installing soon


Pretty happy with how the rear and front sub frames turned out
I figured since the car is secured, now would be a good time to remove all the original body wood, I had already installed a new top kit but I haven’t done the body or a complete Model A body wood before.
Removing the old wood proved to be a bit of challenge regarding the A pillar posts, I removed all the nails and bolts and it just didn’t budge, I realized that when the car was original that the A pillar has a number of screws that go in the wood from behind the quarter panel, so Ford obviously installed all the wood before the sheet metal?? I ended up drilling a bunch of 1/2” holes down the Center of the old A pillar wood and prying it out that way, after I removed the screws that were installed from behind
I have the new body wood all cut to accommodate the chop amd stained
Will be installing soon
John in Oz
Well-Known Member
Dean just a curious question, are you going to use an engine tube under the motor between the chassis rails, they not only make the chassis more solid there but also stop the risk of the chassis rails splaying in time. Splaying as in twisting so to speak, as the distance between the bottom of the rails and the top will change. I had a 32 roadster once and over time that happened.
Last edited:
The pic of the b pillar brought back some memories.
I started a 29 2dr years ago got it to a roller, lost interest and sold. Took all wood the outta that thing and had a bonfire,lol. Built a metal b pillar, bunch a framing for a hatch back it was gonna have blahblah. Really like the way your car sits, wheels etc great build!
I started a 29 2dr years ago got it to a roller, lost interest and sold. Took all wood the outta that thing and had a bonfire,lol. Built a metal b pillar, bunch a framing for a hatch back it was gonna have blahblah. Really like the way your car sits, wheels etc great build!
Well I got all the body wood installed and it turned out nicely. Forgot to take pictures but will post some another time, after I put in the body wood kit I decided the time has come to tear the entire car apart to finish the last welding on the chassis amd start painting the suspension, frame etc. and then put it all back together. I’d like to have the coupe running and driving this year by the fall if possible
I’ll tell you getting the body off the frame by myself was interesting to say the least but it came off fairly easily
A few pictures


I’ll tell you getting the body off the frame by myself was interesting to say the least but it came off fairly easily
A few pictures
For sure the shop space is small but I manage somehow to get things done….not always the easiest or cleanest either at times lol
Been a busy last couple weekends pressing forward on the chassis, I finished all the welding and filler pieces and now have it all back together and very close to being done with it for now, only rear brake lines to run yet and make the driveshaft. After that I’ll wrap it all up and start a bit on getting the body on primer and back on
A few pics:
Attachments
Thought maybe some of you island guys would likely know the builder of my flathead and probably more history of it then I do.
The motor was built by Sid Moorhouse for Larry zalinski I believe and it was supposed to go in a 36 Ford coupe here on the island is what I heard. The motor change hands and was sold to Larry Woolsey who was going to put it in a 34 Ford pickup, that project was sold and that’s how I got it. I had spoken to both sid and Larry Z to confirm the story as I did receive a build sheet of the motor and parts etc and was happy to speak to them both. Now I have never met them in person but I have heard there names pop up all over Victoria, Larry Woolsey who I bought it from also has a very nice blue 34 Ford pickup that is finished.
Anyways just thought maybe some of you know these names amd perhaps the 36 coupe it was originally built for?
With that said I sure am looking forward to hearing it run in due time!!
Noticed the tops of the doors seem to overlap rather than fit flush. Is that the way they are made or does it still need to be adjusted?Looks great..really like the wire wheels and stance…you still undecided about your wheel choice?
Thanks, that’s the way the doors fit, as for the wheels I’m going to run with the 35 wires for now anywaysNoticed the tops of the doors seem to overlap rather than fit flush. Is that the way they are made or does it still need to be adjusted?Looks great..really like the wire wheels and stance…you still undecided about your wheel choice?