| |
Wiring
the Beast
by Frank Colgoni |
| |
|
|
|
With the insulation completed, we can move on to the wiring. In
article 16,
we introduced you to our wiring kits. Specifically, the Ron Francis
Wiring main panel and the Telorvek fuel injection wiring system
by The Detail Zone.
Later,
in article 32, we showed
you the area between the cabin and the trunk with some of the
components in place. After that, we made some changes to accommodate
some additional "stuff". As you'll see, it's now populated
to the max but very tidy. Virtually every square inch has been
utilized.
We'd
like to acknowledge the workmanship of Scott Forbes of Lowdown
Hot Rods. He was meticulous in routing, bundling, layout and termination
of our wiring.
|
| |
We'll
start off by reviewing what we have facing trunk-side out
 From
the left: on top we have our Custom Autosound Secretaudio head unit
From
the left: on top we have our Custom Autosound Secretaudio head unit
followed below by a Custom Autosound 10 disk CD changer followed
by a Ron Francis Wiring Advantage panel. To the right is an Air
Ride
tank and below is our battery box. |
| |
 Picking
up from the Air Ride tank and battery is the Telorvek fuel
Picking
up from the Air Ride tank and battery is the Telorvek fuel
injection wiring distribution/computer interface unit. |
| |
 In
the top left (driver's rear quarter) is the Air Ride compressor.
In
the top left (driver's rear quarter) is the Air Ride compressor. |
| |
 And,
in the top right (passenger rear quarter) is the remote wiper motor.
And,
in the top right (passenger rear quarter) is the remote wiper motor.
|
| |
All
together, it looked like this before wiring.
Click HERE
to open in new window - click back to return |
| |
 The
Telorvek unit before wire distribution
The
Telorvek unit before wire distribution |
| |
 The main fuse panel
 |
| |
 First to get run are the
battery cables.
First to get run are the
battery cables.
They are fed through our wire troughs (see
article 32). |
| |

The technique with the
Telorvek kit is to run the wire from the ultimate termination
point back to the panel. Our longest termination point was the
throttle body.
Everything else then follows according to the instructions.
|
| |
 After
running everything back we ended up with huge collection of wires.
After
running everything back we ended up with huge collection of wires.
Not to fear however as every wire is marked. As you can see, there
is plenty of wire when you order the longer wire kit. |
| |
 You
can see the wire trough becoming populated with the additional wires.
You
can see the wire trough becoming populated with the additional wires.
|
| |
 After some trimming and
termination and bundling things are looking pretty neat.
After some trimming and
termination and bundling things are looking pretty neat. |
| |
 Similarly, the wires in
the cabin are bundled.
Similarly, the wires in
the cabin are bundled.
|
| |

The main panel is treated
to the same tidy arrangement.
|
| |

At the firewall, everything
passes through three openings and the balance
of the wiring goes up under the dash. What isn't shown is a number
of wires that are routed through the frame rail to the very front
of the car.
No wires run underneath the vehicle.
|
| |
 Almost there
|
| |
 Gauge wiring that will
be connected to the Ron Francis Wiring harness.
Gauge wiring that will
be connected to the Ron Francis Wiring harness. |
| |
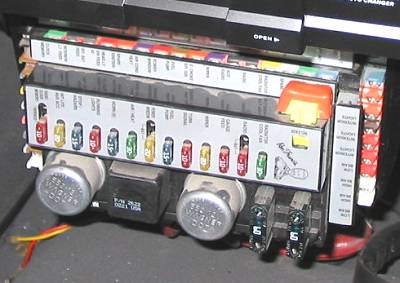
 Detail of the terminal
numbered addresses
Detail of the terminal
numbered addresses
and printed wires at the Telorvek panel. |
| |
 One
of two Ron Francis grounding junctions that we used.
One
of two Ron Francis grounding junctions that we used. |
| |
|
| |
And
from the cabin side HERE
Both
the Ron Francis Wiring and Detail Zone (Telervek) components once
again proved easy to install and terminate. Everything makes sense
and the instructions are very straightforward and logical.
|
| |
 While we're under the
dash, here's a look at our Smart Parts
While we're under the
dash, here's a look at our Smart Parts
combo hood and trunk release handles. |
| |
|
