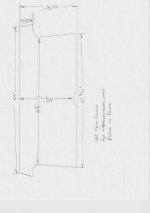
What is the rough dimensions?

Navigation
Install the app
How to install the app on iOS
Follow along with the video below to see how to install our site as a web app on your home screen.

Note: This feature currently requires accessing the site using the built-in Safari browser.
More options
You are using an out of date browser. It may not display this or other websites correctly.
You should upgrade or use an alternative browser.
You should upgrade or use an alternative browser.
Wat cha workin on??
- Thread starter Bash and scratch
- Start date
Well, got about 85% done the swivel castor install, had an issue with porosity with one weld, knocked it back down with a carbide burr, sharpened a tungsten, and just for giggles, decided to check the CFM on my Flowmeter....only to discover it was only at 15 CFM.?? WTH?
Anyways, I dialed it up to 25, and went to put the tungsten back in the torch. but managed to knock the torch off the corner of the fab table.....and broke the Ceramic Gas CupAnd when I checked my little spares kit, I discovered that I have no spare for the broken one
And, when mounting the castors to the 6" x 6", it seems like some of the lag bolts were nut pulling up tight (dammit!!). So, before I go and plop approx 450 lbs of mid sixties Mercury box onto my Rube Goldberg contraption, I may have to get some of these:
By using these, I can just drill the existing hole to a larger diameter, then crank the inserts in with an Allen Key, then use 1/4"-20 fasteners to pull everything up tight. The last thing I want is to lose a castor while rolling the Fab Table back over to my garage with the Merc box on board..........
So, next time around I'll make another pass with the tig and hope for no more porosity, then deal with getting everything swapped over to inserts and 1/4"-20 fasteners. Each castor (currently) has (4) lag bolts attaching it to the 6" x 6", and each 6" x 6" has (4) lag bolts through the keyholes in the 2" x 2" x 0.125" WT tubing. So that means I need (32) inserts & (32) 1/4"-20 fasteners.
James
Well, I picked up a new gas lens for the Tig earlier in the week, and the Inserts showed up yesterday (THANKS Ken!!).....but looks like I dropped the ball, because none of the nut & bolt places are open on Sat
I may try the nearest Habitat for Humanity Re-Store, you never know what you'll find, and sometimes their prices are really good, other times, they want more than the big box stores?? Anyways, I still have a couple welds to repair, and a bunch of holes to drill to a larger diameter before I install the inserts, so I'm not at a complete stop, I'll go as far as I can, and deal with what remains after the weekend if HFH doesn't have what I need........Got all that, what I don't have is a place to do that.Rather than CNC cut (water jet or plasma) which requires programing time, I would go with tracing from your cardboard and cut with a nibbler or zip disk and clean the edge with a flapper disk.
Where the Falcon is stored, it's a no-no to work on vehicles and must sell a bunch of antiques and car parts to get some room in the garage.
Only then I might be able to it but it's still tight.
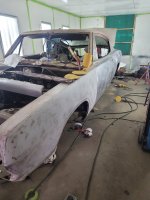
Latest project,, never been a fan of this body style myself and honestly really not a fan of how the aftermarket parts fit these things....

Shaune,, Bunch of fixes to screw ups, mini tubs, dash work, replaced the floor boards and cab corners, fitment issues, then on to making it smooth and sending it to the paint shop.Details on that Neil ?
Yup, got it. Looking around for material.
Mild Steel Sheet Cold Rolled | Metal Supermarkets
Mild Steel Sheet Cold Rolled is produced from rimmed, capped and semi-killed steel. It is intended for exposed or unexposed parts involving bending, moderate drawing or forming and welding. This material should be painted or plated to prevent rust.
 www.metalsupermarkets.com
You can get the 20g sheet cut to rough size for about $65 at Metal Supermarket. You can order it online and just go pick it up. They are not the cheapest but they will sell you exactly what you need size wise. I use them a lot as they are way less hassle as opposed to trying to deal with bigger steel companies so the extra cost is worth it.
Well, all the lag bolts have been removed, holes opened up, and the inserts installed! I put the swivel castors on today (did the stationary ones yesterday). Thirty five inserts later, the fab table is now mobile.Well, got about 85% done the swivel castor install, had an issue with porosity with one weld, knocked it back down with a carbide burr, sharpened a tungsten, and just for giggles, decided to check the CFM on my Flowmeter....only to discover it was only at 15 CFM.?? WTH?
Anyways, I dialed it up to 25, and went to put the tungsten back in the torch. but managed to knock the torch off the corner of the fab table.....and broke the Ceramic Gas Cup
And, when mounting the castors to the 6" x 6", it seems like some of the lag bolts were nut pulling up tight (dammit!!). So, before I go and plop approx 450 lbs of mid sixties Mercury box onto my Rube Goldberg contraption, I may have to get some of these:
By using these, I can just drill the existing hole to a larger diameter, then crank the inserts in with an Allen Key, then use 1/4"-20 fasteners to pull everything up tight. The last thing I want is to lose a castor while rolling the Fab Table back over to my garage with the Merc box on board..........
So, next time around I'll make another pass with the tig and hope for no more porosity, then deal with getting everything swapped over to inserts and 1/4"-20 fasteners. Each castor (currently) has (4) lag bolts attaching it to the 6" x 6", and each 6" x 6" has (4) lag bolts through the keyholes in the 2" x 2" x 0.125" WT tubing. So that means I need (32) inserts & (32) 1/4"-20 fasteners.
James
Next will be cleaning the whole garage up, and moving/reorganizing stuff so that there is a clear path from where the table normally sits, to the overhead door. This will no no small feat, but needs to be done, and is LONG OVERDUE.
One thing about buying stuff on Amazon (the inserts). While the quality seems OK, there was no mention in the listing on Amazon, or in the pkg that tells you what size you need to drill for the inserts.
So, I measured (as best I could) the root diameter of the external thread, and did some playing with the numbers, came up with several drill sizes I thought might work. I'm no woodbutcher, but I've done enough drilling and tapping to know that the material you're going to "tap" plays into the size you drill, (softer = tighter). I ended up taking one of the "off-cuts" from the (softwood) 6" x 6" posts, and drilling a number of holes all the way from 3/8 " down to 5/16". I then ran an insert into each to see if it seemed like "the right fit".
On the 3/8" hole, the insert seemed to go in too easy, so I kept going down the row of holes, and surprisingly, the insert went into the 5/16" hole with less fight than I had expected. So I started punching holes and running the inserts in. All went well, until I got to one hole, that happened to be in the middle of a knot
Well, that insert simply was not going to into the material, as the knot was very hard. So, IIRC, that one got drilled out to 3/8", and was still a fight to run the insert in!I'm glad that part is over, it took considerably longer that I'd imagined, but there was a learning curve
Anyways, progress is being made, but of course it never goes as quickly as one would like
And it has me thinking about what I could be doing on the Mustang. There are many things that need doing, some require $$, others, just time, so the latter will be my focus when I actually get back on it.
James
Last edited:
