Wat cha workin on??

Bash and scratch

Well-Known Member
Supporting Member
Did one of these a few years back perhaps it's time for another go around?? Show us (please) what you're working on? What's your latest project?
 
Last edited:
Haha…well lucky me there is another page of my tasks. Been picking away on my 3 season daily, well soon to be.
Steering box rebuild, which prompted several other minor fixes. Door latches next.
 

Attachments

  • IMG_0981.jpeg
    IMG_0981.jpeg
    75.6 KB · Views: 8
Been putting one of these off for so long because of the cost and well at my age do I really need to be buying more tools, but the other day I finally pulled the trigger and ordered one and well that's the project for the weekend as it will take a few slight mods to make it work with my set up.

2_41e4ce62-f719-4b21-8784-fb457ed852f3a.jpg
 
Been putting one of these off for so long because of the cost and well at my age do I really need to be buying more tools, but the other day I finally pulled the trigger and ordered one and well that's the project for the weekend as it will take a few slight mods to make it work with my set up.

View attachment 10675
I’ll bite…what will that be, or be a part of?
 
As for what am I working on, plugging away on a 49 Pontiac torpedo back 2 door. Bought as a project/ quickflip. That was 3 years ago haha.

It is a Canadian car (Chev body) was sitting on a g-body frame when I got it and not much else.

I've now got a 350/700r4 installed, radiator and separate trans cooler, van steering column in and hooked up, power brake master cylinder and brake lines installed and working, gas tank installed and gas lines run but not completed. Complete exhaust is done, and the driveshaft installed.

It is a budget build. The exterior is staying patina. Most parts are what I have laying around, from the autowreckers, or Kijiji and Marketplace. I had bought a van for the engine/trans and parted it out for more than I paid for it.
I am installing the power seats from a Taurus parts car I happen to have sitting here. The drivers seat is mounted, and the rear seat fits remarkably well. I have to figure out the passenger seat, as it does not tip forward to allow rear seat access, and I already wrecked the recliner trying to modify it :rolleyes:

There was no plan for me to get this thing on the road, just run, stop, steer and drive, and then sell it; but the closer it gets the more I am inclined to see it further along. BUT then that will involve buying windshields and rubber, doing more than a basic wiring job, and the myriads of other things it will take to pass an inspection. I think I talked myself back into selling it while typing this. :unsure:
 
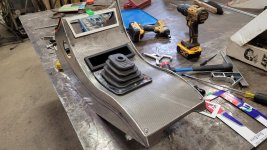
Doing a "Ghetto" quick & dirty castor install on my fab table, so that I can use it to get my 1964-1966 Mercury LWB box & tailgate out of my neighbour's garage.....have the end with the stationary castors done, now just have to do the end with the swivel castors....

Well, got about 85% done the swivel castor install, had an issue with porosity with one weld, knocked it back down with a carbide burr, sharpened a tungsten, and just for giggles, decided to check the CFM on my Flowmeter....only to discover it was only at 15 CFM.?? WTH?
Anyways, I dialed it up to 25, and went to put the tungsten back in the torch. but managed to knock the torch off the corner of the fab table.....and broke the Ceramic Gas Cup :( And when I checked my little spares kit, I discovered that I have no spare for the broken one:(
And, when mounting the castors to the 6" x 6", it seems like some of the lag bolts were nut pulling up tight (dammit!!). So, before I go and plop approx 450 lbs of mid sixties Mercury box onto my Rube Goldberg contraption, I may have to get some of these:
81KQiKi8YFL._SL1500_.jpg


By using these, I can just drill the existing hole to a larger diameter, then crank the inserts in with an Allen Key, then use 1/4"-20 fasteners to pull everything up tight. The last thing I want is to lose a castor while rolling the Fab Table back over to my garage with the Merc box on board..........
So, next time around I'll make another pass with the tig and hope for no more porosity, then deal with getting everything swapped over to inserts and 1/4"-20 fasteners. Each castor (currently) has (4) lag bolts attaching it to the 6" x 6", and each 6" x 6" has (4) lag bolts through the keyholes in the 2" x 2" x 0.125" WT tubing. So that means I need (32) inserts & (32) 1/4"-20 fasteners.

James
 
Last edited:
Was out in Calgary for week but home now and will be back at this….Mustang is getting the springs rearched, and my first attempt at rust repair under the battery tray. Along with new rear brakes and general tune and tweak and tighten of stuff.
Next in the book of things to do will be to get back at the 52 frame. Finish boxing another 5 feet and get under floor brake pieces mocked up. Hopefully all before the lake ice is gone because then it’s on to other projects.
 

Attachments

  • IMG_0209.jpeg
    IMG_0209.jpeg
    98.2 KB · Views: 26
  • IMG_0208.jpeg
    IMG_0208.jpeg
    130.9 KB · Views: 26
click to enlarge

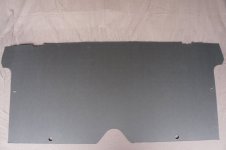
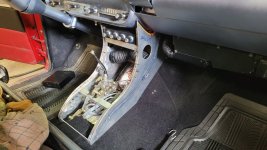
Rear upper back seat cover.

Have to take the rear seat out to install.
Its cardboard, thinking of getting it in 21 gauge steel as the tank is in the trunk just in case of a bad rear ender.
Since I really don't have a place to really do any fab work, I phoned around to several fabrication shops for a price.
Job was just too small for most but did find a smaller shop that does this kind of work.
20 gauge steel is only $80 buts its 2 hours of work @ $175/hour that really upped the bill.
And it's not painted either for that.
I think there is a water jet place in town that it might be less expensive.
 
Brian, Sent you a PM
Yup, got it. Looking around for material.
Since I really don't have a place to really do any fab work, I phoned around to several fabrication shops for a price.
Job was just too small for most but did find a smaller shop that does this kind of work.
20 gauge steel is only $80 buts its 2 hours of work @ $175/hour that really upped the bill.
And it's not painted either for that.
I think there is a water jet place in town that it might be less expensive.
There's two water jet shops that can do it. One has quoted $281 and the material is supplied too.
They do all the digital conversion of the cardboar cover.
That's almost $200 less than fab shop.
 
Rather than CNC cut (water jet or plasma) which requires programing time, I would go with tracing from your cardboard and cut with a nibbler or zip disk and clean the edge with a flapper disk.
Yup, you could likely buy the material, and the tools required, and do it yourself and be money ahead, not to mention end up with new tools in your arsenal!

**Have a look on Marketplace & Kijiji, you can often find material for a bunch less $$ than from a supplier.
 
Tired of waiting for the snow to melt to shake down the lincoln ,I have started on the console to cover yet another mass of wiring and electronic components.
20240322_152419.jpg
 

Attachments

  • 20240322_154225.jpg
    20240322_154225.jpg
    89.1 KB · Views: 32
  • 20240322_182501.jpg
    20240322_182501.jpg
    111 KB · Views: 31