
Navigation
Install the app
How to install the app on iOS
Follow along with the video below to see how to install our site as a web app on your home screen.

Note: This feature currently requires accessing the site using the built-in Safari browser.
More options
You are using an out of date browser. It may not display this or other websites correctly.
You should upgrade or use an alternative browser.
You should upgrade or use an alternative browser.
57 Ranchero build
- Thread starter jvo
- Start date
Another intriguing thread to follow along. Thanks again for sharing...giving hope!
Greg
Greg
I'm working every day, and you can't see much progress. Measure, measure, measure, fit, fit, fit. Nothing is welded in place yet, on the circumference of the box. I'm still getting the passenger side to fit better. Drivers side fits the tailgate area nicely now. I need to get the pass. side to a one or two finger fit. By that, I mean I won't have to grab it and twist and pull it to get it into the proper relationship to the rest of the body. It will fit if I force it, but some more hammer and dolly work along the top of the fin will help that fit immensely. I hope.
Also, I am fitting the inside rear corner box panels before I start tacking anything, to ensure they will fit properly. These pieces are 16 gauge, so its more like blacksmithing than metal shaping. Slow, but its coming.


Also, I am fitting the inside rear corner box panels before I start tacking anything, to ensure they will fit properly. These pieces are 16 gauge, so its more like blacksmithing than metal shaping. Slow, but its coming.
Been making progress although not as fast as I'd like. Everything is fitting nicely now, and I'm ready to scribe and cut the tops of the quarter panels, so as to fit and weld them.
BUT, I decided it would be way way easier to finish the inner fender well, and finish welding the outer quarter panel where I couldn't get at it when the wheels were still on it. Metal finished the whole driver's side of the body now. Its ready to prep for painting.
Also, its way easier to be able to finish fitting and welding the inside box corners once I cut out the area for the fuel tank. Thus, I now have the fuel tank pretty much fitting into place. I can remove it now, then I can stand inside the box as well as outside for the fitting and welding about to take place.
Remember, this floor pan is from a four door sedan. Thus, the tire well is not the same as a regular Ranchero. I found this fuel tank online after much measuring and searching. Its a 1995 Ford F150 tank with pump. Fits the space nicely, and its only a hair over 7 inches deep.
I have to take a trip to pic a part to look for some weather stripping maybe from a mini van door or something with a pinch seal like the outer edges of the gas tank. I plan on putting the weather stripping on the edge of the gas tank so as to seal this area on top of the tank from the elements.
The bed floor will be hinged at the front so I can access "stuff" under it, like the duster and polish and tire stuff and shit like that, right?
That's it for now.
Nice stuff
At long last, I have one box side spotted in place. I had to melt a ton of lead off the top in order to be able to shear it to fit and weld. My shear wouldn't go through 3/16 inch of lead. I'll probably replace those areas but for now its all lined up in its final resting place.


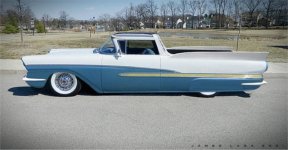
Came across this rendering on another site:
"Just completed this computer rendering of some of my ideas for a RADICAL kustom Ranchero. I used part of the roof from a '55 Victoria Skyliner (also chopped the top while I was at it)...fins were "donated" by a '57 Studebaker Hawk...fabricated front and rear rolled pans and used the thin bumpers from a '59 Corvette...'58 Mercury Turnpike Cruiser skirts...Lowered the stance and shaved the door handles, emblems, and gas door...added some gold anodized textured metal inside the side trim for some additional sparkle."
Click on photo to enlarge
Attachments
Last edited:
Looks really good John. I would like to come by and have a look at it some day.
I have had 1/2 of my shots so far so hoping I'm safe.
A friend of mine called you asking about getting some work done on his 73 Bronco and said you said you have retired from doing jobs - other than your own work obviously!
Sorry to hear that! I did finally get a look at his Bronco and the biggest rust problems are on floor and inner fenders. All flat areas where panels are available. I am probably going to help him with those areas as they are all hidden from view. That Bronco was bought by his grandpa new and only has 53,000 miles on it with a 302 small block. I am not really a Ford guy but sure like that truck.
Anyway really nice work on your Ranchero and once my 56 is legally on the road I will drop by with it to show you.
Take care.
I'm still planning on doing some carry in parts, but no complete cars in my shop any longer other than what is mine. I haven't gotten much done on my own in the past couple years. Arthritis is setting in, and I need to get caught up on stuff before it gets where I can't do anything.
So, later today, after I go do some wiring at my brother in law's place, where I've been helping him with a major renovation for the past couple months. I think after rebuilding my oldest son's fence so they can sell their rental property, that I'm done with that.
I think Duane has all his metal work done finally on his Corvair, so I shouldn't have any more to do there.
My son in Fernie has a long list of reno projects for me once covid is over, but hopefully I can get something done between now and then.
Have to run over to the wife's mom to get her dishwasher going again today, right after we go pick up our tax stuff.
Maybe get to work on it tomorrow?
So when do you get the time to work on your stuff???
I hear you on the arthritis as my thumbs seem to be going! Too many years of digging holes in the hard prairie ground.
So you are saying sometime this summer we could bring you a fender or hood or door or two?
I hear you on the arthritis as my thumbs seem to be going! Too many years of digging holes in the hard prairie ground.
So you are saying sometime this summer we could bring you a fender or hood or door or two?
SHHHHHHH. It's been a couple years since I have worked on the 57. I'm currently knees keep in a home renovation for the wife, but I managed to sneak in a few hours on the Ranchero. I got it up on rubber again, and I can move it around on dollies so I can get at it to do something to it. Did a bunch of re re re on the tailgate and quarter mounting that you cannot see, but the gaps are gonna be just fine now and its all lining up like it should.
So.I was wondering what the taillight area would look like as it's slightly longer than the original Ranchero. That is where some of the extra length of the Fairlane 500 comes into play. The taillight housing still has to bolt on there, but the bumper will still stick out slightly past it.
I think it will look okay once the rest of the lower sheet metal and bumper are there. Has to all be built mostly from scratch at this point.
I have a 56 Chev one piece rear bumper to fit there. Just have to cut it into 3 pieces and narrow it a couple inches and it will fit really nicely.
Still working on the bumper mounts at this point when I can sneak in some more time.
John in Oz
Well-Known Member
Wow, man alive you are doing a brilliant job there. On one of the C.R. runs I once looked at a Ranch Wagon thinking of a purchase but when I did a close look I could see where rust was developing all through the seams etc and backed away from it. It was a shame because it did look pretty good at face value. As you are finding with this there are often hidden scabs to knock off so good on you for keeping with this.