1958 Chevy Suburban Build

Martin

Well-Known Member
Hopefully below is a picture of the day that I struck the deal on this 58 Suburban.
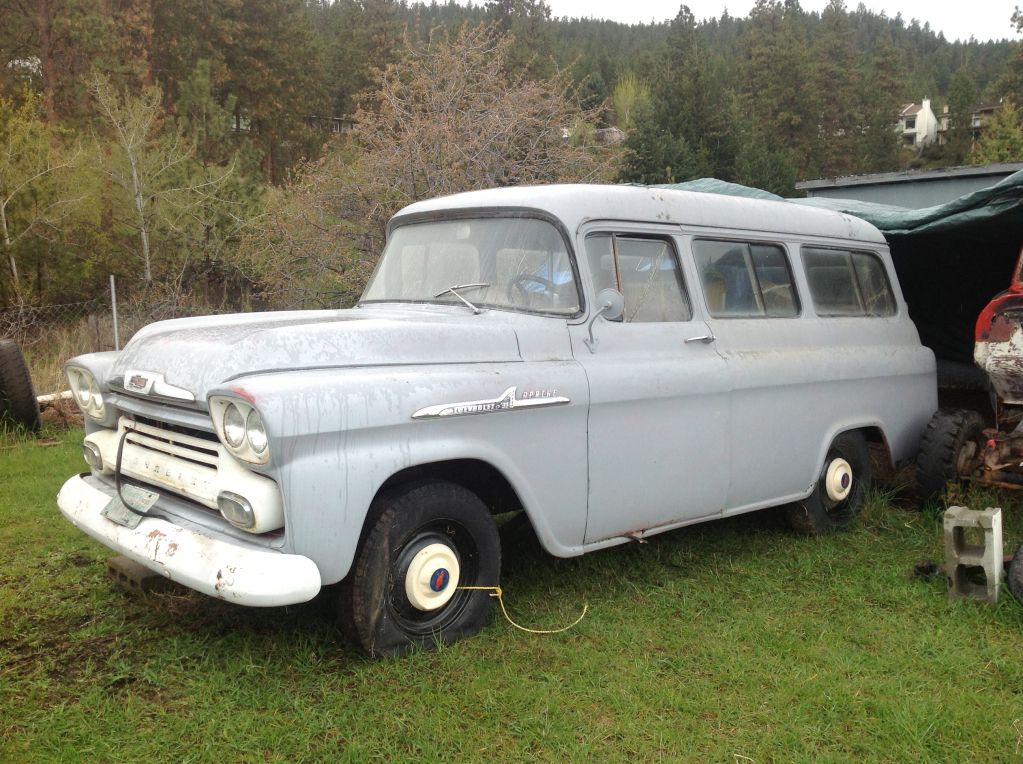
The chap I got it off is/was a member.
Seems it used to be an Idaho school bus which seems true enough as its original colour is yellow and it had rock hard mud literally like concrete in every nook and cranny. Pressure washes didn't touch this and it literally had to be chiseled out.
Anyway
Ta daaar
 
Last edited by a moderator:
Arrival day. The chap I bought it off delivered the Sub for a small fee which was a lot cheaper than me renting a uh alum to get it home.this was April 2013


Next step is coming up with a plan, well, I had no real idea what condition the engine was in but pretty much new that it needed a V8 in there though there was a full engine gasket kit that came with it to rebuild the 6.

 
After the engine was out it was pretty obvious that it was only fit for a boat anchor, the crack in the block went across four cylinders, oh well.


Engine out, now, how about that patina look.


Well, maybe not so much, especially after three different people said it looked like a hippy mobile

 
Although it looked fairly rust free there also came with it a lot of free rust. Although from my buddy's that have seen it and compared to other suburbans this one wasn't to bad, but, beware the things that lurk beneath.

I'm no welder but I am getting my practice in with this somewhat.
Drivers side rear rust bubbles were quite a bit more extensive than appeared and this was my first holy crap moment of how am I gonna fix that. No repop panels made for the subs.
Passenger side rear looked sorta ok but was quite bondoed up so I removed that and pulled the dents out.
Rear wheel arches looked solid enough until ya start poking so both needed repair. Apparent the fender profile on the early sixties stepside is the same but I didn't go there. Other little holes appeared as ya dig and I learned that there is absolutely no point in trying to weld to half decent rusty metal as it just fizzes away like a fuse (though I still tried to get away with it in other places, to little or no avail)


Good project Martin, are you taking the body off the chassis, if so you will need a few mates around and a BBQ with cold beer for the helpers after the lifting :D
 
The old sub used to have a roof rack but all that was left of that were the rusted out roof brackets which were full of crud and moss. The four brackets were removed and the bolt holes welded up. There was a little patch repair required as well.

The lady wife right from the get go said she liked the sub which surprised the heck out of me as she is just not into the old cars at all. She likes the 52 Merc pickup because of the utilitarian value in it, as in at least it can be used as a pickup.
The sub pretty much for the same reason, we can haul the kids and the dog and it's got decent space inside.
So that pretty much determined that the steering and front end needed updating and mustang two was the choice rather than a clip or restoring the original components.

Donor car makes it appearance. 1980 Z28 Camaro. Engine trans and axle, yummy, I hope.


To get the Camaro axle to fit the original Camaro mounting hardware had to be removed. New spring perches were bought but proved to be a little to wide so here's what I did.


Quite pleased with the result and the fit was just right.

Here's the Camaro axle after fitting. Perches not welded until much nearer completion of vehicle so that the angles can be achieved of trans and prop shaft ect. The reverse battering ram tow bar has been removed

 
Last edited:
Hey...I love the battering ram on the back. Had one of those on the '35, but it had a nice curve built in. Pretty sure they couldn't have towed anything with it as it was attached to a very thin x member right across the back of the frame.

For a guy that doesn't weld you're doing a bang up job.
 
Model A Bone couriered a mustang two front end down to me a couple of days prior to me setting off for work in the Philippines for 8 weeks.
Just prior to me getting home after my time away my buddy whom has the Rod shop in Armstrong came and collected the sub to fit the mustang two. Due to other priorities and a couple of small part issues, nothing major, it wasn't quite ready for me to take straight away so it was out of my sticky little hands for a couple of weeks. But, it was professionally fitted by a certified welder and past hot rod builder which made me happy.
Sat a little lower than I expected but no worries


So these are the seats that are hopefully going in, bought them so they better, from a 98 Tahoe I think. Can't believe how comfortable they are. I actually got these and the Camaro from the same guy as I got the suburban from and this is the direction he was going with it. Not too shabby says I. I picked the wheels up in town for $90, wasn't sure what I was looking for style wise but I think the chunky ness of them go well with the size of rather sub, they shine up once too.

 
Last edited:
Photobucket although showing all my photos in the album does not show all of them when it comes to being available for posting so there are quite a few that I can't put here, never mind.

So at this point I've only had about five weeks actual play time with the sub which had me quite pleased with the rate of progress. I figured approx a two year build with it actually running this year, that's yet to be seen of course.

Next step was taking the body off the chassis, I have a wooden a frame in my shop that I use to do this. I used it before doing my 53 GMC panel van and the 28 Model A.
Roll the vehicle under the frame. Jack it up as high as ya can. Rope, yup rope, the body to the frame determining the central balance point. Undo all the body to chassis mounting bolts (10) lower the chassis from the body back to the ground. Remove the back wheels and roll the chassis out with front wheels on but back end rolling on its brake drums. Work benches then propped under front and rear with wedges to take up any slack.
I also placed jack with wood on top under the drivers and passengers side step. Looks fragile but was very solid.


Now doing that obviously let me get to this. With the weight off the rear end it looks high enough for one of Evil Knievils Grand Canyon jump ramps. Still digging that good old Idaho mud out at every stage.


Here it is after three days of sand blasting with my little hobby sand blaster, never again, someone getting paid to do this crap next time.

 
Soooo, having taken all the crud off there's only one logical next step, fun in the sun with paint right.


Now that was fun so let's do it again.


Then ya gots to make all the parts that are going on it pretty as well.


Springs had to come back off as they were, well, just to springy with no weight on the chassis. Still sitting with ready rod at the moment.

 
Last edited:
Wow,You're doing great on a sCOOL bus.:D Reminds me of starting on my '38 Willys in the driveway. Keep it goin !!
 
That's looking nice Martin! I'd ask a favor of you tho'..........when you get ready to make your next engine lift, put the rope away and acquire an engine lift device. Much safer, and the family will thank you for it.

Bgbkwndo.
 
Lower Hinge pockets needed serious work on both sides though this wasn't really evident when I bought the sub. I thought it looked easy enough so I did the sensible thing. Went back to work for another eight weeks and paid my buddy to do it, the same fella that welded up the mustang two front end.
Worth every penny of his time and I'm real confident they are in there real good.
This really helped get things moving with the build as well as I saw it as one of those hurdle points that needed getting over to continue.


I did however when I got home in December decide that I could handle a fairly straight forward panel replacement. This started off as a plate size rust out are that was to thin to do anything with I was going to cut the new panel but decided to remove the floor to the panel size.


It went in quite well with a little coaxing and fettling.


The worst part of being home this time has been the under body scraping and poking and dirt removal and grease removal and surface removal and underseal removal "but" 5 weeks later it allowed me to have it looking like this. Which really is kinda unnecessary but while it was just hanging there, seemed a shame not to do some thing.


So this is kinda getting there now. Been painting stuff in my fridge work shop so had to build my little easy bake oven area to dry the paint.
Engine and trans sit nicely cradled in the frame with plenty o room around it.
Bought a pair of new rear dump headers that were, well, made for the application.


New rear drums and shoes but original 1980 hardware, needs a clean.


Shot blasted and painted, also dropped paint fluid on the painted parts to see if it was any good, no bubbling no blisters so is good. Have no idea what paint it was now as I dinged out the empty tins, doh.


Looks better than it used to, now, just gotta cover it with a brake drum or two so no one can see, mmm.


This is the original gauge cluster and I took it to work with my last time round (Curacao and Belize) for something to do. Took it completely apart, cleaned it up and painted it and polished and gave it a good going over. I'm liking the end result especially given the cost of replacements ones.


Thanks Martin that is a great build you have been doing there, man the whole family will be happy to go cruising once you are finished, good on ya pal.
 
....wow, you're doing one heck of a fine job on the 58. This is going to turn out great...:) and the cluster looks awesome.
 
Wanted to stick with Camaro hand brake cables on the axle for ease of fitting and future replacement, only trouble was they were a little to short to fit the mounting point of the original suburban mounting points.


So pondered what would be the easiest but most effective and simplest way to do it without it looking like an extra out of place lump had been added to the chassis. Came up with a piece of 2x1 box section and cut it as best I could with my limited tools.


With the aid of a couple of brake cable extension clips and two T headed bolts the Camaro cables fitted to the original cable set up quite nicely. I did have to put in two pulleys and file the original through frame holes a little to avoid rubbing but it works.

 
Last edited:
The mice were living in the upper part of the roof above the screen and peeing down the A pilar on the drivers side and it rotted out the outside. Wasn't quite sure how to go about this. A part of the column was straight but the rest curved every which way and also twisted.
I ended up forming an 8" long piece with a 90 degree bend.
Measured and marked up the left side every Hal inch and cut to the 90 degree. On the right side I did the same but staggered it by 1/4 inch, that way it would twist longitudinally, forward, back and left to right.
By the time I finished cutting out the rot there wasn't a lot left. These holes are before the rot was cut out.


After what seemed like forever I had it sorta done. I'm going to try and lead fill the pits so that any water under the new seal won't pop out any fibre glass filler.

 
Last edited:
Thanks for posting all this Martin. Nice to finally see it in person after hearing about it over the phone for so long. Great job. Keep the pics and build info coming.