|
|
|
|
AC and Heat for the Koupe
|
|
Text
and photos by Bob Klowak
|
|
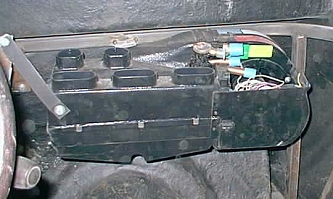
We
are now hanging the heating air conditioning unit from Vintage Air. This
is the new unit using servo motors instead of cables to operate the dampers
and temperature controls. This means you can put the controls anywhere
you want or the AC unit and not worry about twisting and kinking the cables.
|
|
|
|
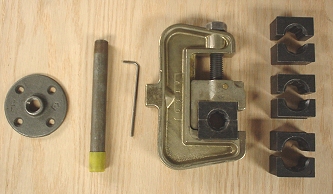
This is the crimping tool necessary to make a fitting. We are using the
ribbed fittings we are all familiar with. These types of fittings were
designed for the use of R-12 refrigerant. The other fittings used for
the new refrigerant R-134A are not ribbed but are round in shape and are
called bead lock. When clamped, the bead lock system can hold the smaller
molecules of R-134A. By using R-134A in a ribbed system increases the
chance of it leaking. The molecules of R-12 are larger. I hope I haven't
lost anyone here but it is important to know.
|
|
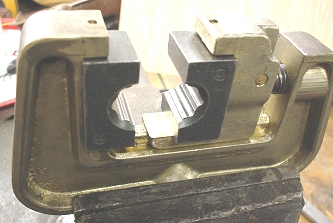
This
is a crimping tool for ribbed R-12. It makes a larger crimp. The ferrule
is placed in the jaws and you crank the handle like a vise till it stops
and you are there. Pretty simple. The tool for R134A is very similar but
uses different jaws that squeeze the ferrule with a different pattern.
|
|
|
|
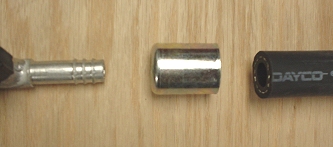
The
hose is cut to length keeping in mind the extra metal on the end of the
hose. Once you crimp the ferrule and you make a mistake you can cut it off
but you will need a new ferrule. If using a bead lock fitting you must throw
away the whole fitting because the ferrule is attached to the fitting -
another way of telling the difference. |
|
This is what it looks like before it is crimped. On the ribbed fittings
it is very difficult to pull the fitting out even before you crimp it,
so be sure of its length. On the bead lock fittings these can be pulled
apart very easily.
|
|
|
|
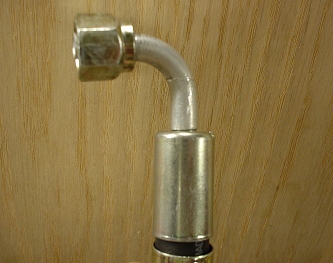
After it is crimped it looks very neat. You can also polish the ends of
these fittings and then clear lacquer the ends to keep them from rusting.
|
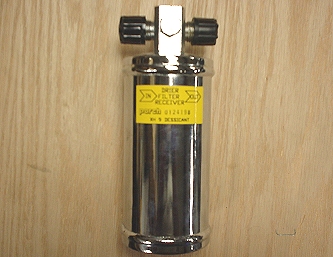
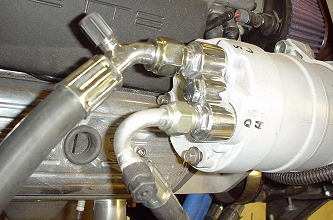
| You
will need a drier to help remove any moister in the system .It also has
a site glass on top between the fittings to help you determine the charge
or amount of gas (refrigerant) in the system. Any bubbles mean it is short
of gas. Unless you are familiar with charging and handling of the gas, you
should leave this to the pros. |
|
|
|
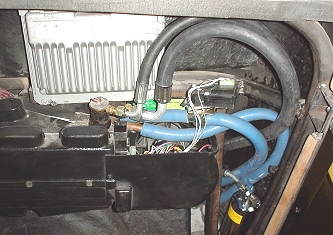
When
routing the hoses, make sure you loop them with no kinks in them. The blue
hoses are for the heater |
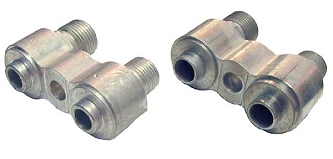
| The
compressor used here is the GM type. There are 2 types out there and an
adapter will be needed to be able to use the fittings supplied with Vintage
Air. The newer compressors have an offset fitting and the older types are
even. We are using the adapter on the right with the offset. |
|
|
|
As
you can see, you can polish the aluminum adapter. Before you order your
fittings lay out the lines and mark the size of the fittings and angles.
Also, if you need fittings to charge the lines as seen in the pix. Because
this system will have to be dismantled, it was evacuated and held a vacuum
to prevent any moister from entering the system. |
| These
are the fittings going into the bulkhead. You can see I used the same ferrules
on the heater hoses. This makes the joint quite permanent but the hoses
are silicone and should last a very long time. If they need replacing they
are very inexpensive and look better than hose clamps. |
|
|
|
|
|
|
|