My procedure to widen a fender.

jvo

Well-Known Member
Supporting Member
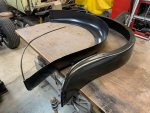
Thought I would post up this job. I'm making these fenders 2 1/2 inches wider for a 34 Ford truck. Nice brand new reproduction fenders, and I cut them in two pieces. Hope they look as good once they're done.

I bought this 6 foot long flexible steel ruler at Bianca Amor's junk store for a couple bucks. Works great for laying out cut and scribe lines. Found the middle of the crown, about 4 3/4 inches from the inboard edge. Clamped it in place, scribed it, and cut it, except for the wire inside the edge of the fender. I'll extend the end of the wire, so there is only one weld there, as they are prone to breakage, as we all know. I'll bend it to follow the new bottom shape once the patches are tacked in place. Lots of clamps so the fit will be precise along every inch the seam.
63277635348__8C966A22-2315-4D37-8506-F70B900B77A2.jpg
63277637287__73B1F39A-0FB1-47B5-BA37-B15269511878.jpg
63278084948__A530D5A3-7383-42B5-B430-A615E1650258.jpg
 

Attachments

  • IMG_2596.jpg
    IMG_2596.jpg
    59.4 KB · Views: 53
63278086295__9F52F64F-C93B-4C45-9715-7963F9683E21.jpg
IMG_2600.jpg
IMG_2601.jpg
IMG_2602.jpg


You can see in the pic above with the ruler, the tacking prodecure has shrunk down the crown a bit. The other pic shows how its supposed to look. Tack welds not ground down yet, or cleaned up.
 
We will back up and show how I mark and cut the strips. The edges have to be straight so they line up, and I don't own a shear, cause I don't have room for it. I could drive across town and use one, but by the time I do that, this will be done. Line is scribed onto sheet metal blank, and cut with beverly shear, right on the line, slowly and carefully.

The vixen file in the pic I got from Jerry Gulley at the MM04 metal meet in Robinson Illinois. It works really well to file the edge straight and true. Takes a few minutes, but works very well.

There is a very slight bend right under the little square, and another sharper bend where the wire edge starts. I have the other end of the new patch overlapping in the middle of the fender about an inch. I'll make the bottom end fit first, then cut the excess of the overlap. Way easier to do this end first, than try to get the bends in the right place after the middle is welded in place, if you follow what I mean.

I forgot to add here, the hammer and dolly pic is there to show what I used to restore the crown after tacking. Low crown dinging hammer, flat face of dolly. We were talking in an earlier thread about hammer and dolly work. I hit fairly hard with the hammer, cause those mig tacks are hard and strong. Hit hard enough to move the metal, ( fairly hard, compared to planishing work), but not hard enough that you start breaking tack welds.

I have my Miller 210 set on #3 ( out of 6 or 7 settings), and the wire feed set at 28 or 30. Burns hot, and makes a nice flat tack. I find I can't tack that hot when working with older rusty metal, but it works wonderfully well with two new pieces of metal. (FWIW)

I still grind off the tops of the mig tacks though, in order to remove any mill scale off the surface of the tack, and to ensure I won't have to stop and melt a huge pile of tack weld, and put a bunch more heat into that spot, before continuing. I did it this way when I was first taught, then I got lazy and didn't grind my tacks. I figured they would just melt in anyway, once I got to them, and they did. BUT, if you look at your heat affected zone when you do that, at each tack, the heat affected zone will get wider, then narrow again once you proceed to your next tack.

Trust me, its way easier to grind all the tacks down to just above the surface of the parent metal, than to fix any warpage you have induced by more or less heat in any given area. We'll touch on that later. Need to go get busy now.


IMG_2608.jpg
IMG_2607.jpg
IMG_2605.jpg
IMG_2606.jpg
 
Last edited:
Again, lots of clamps while lining it all up. Must make sure there isn't any twist in the pieces. The patch strip I made in two pieces as its almost impossible to run it through the e wheel when its 2 1/2 inches wide, and 6 feet long. Too hard to handle.

The first strip that is tacked in place has had a slight crown put into it on the e wheel. If I didn't do that, it would look like a princess auto trailer fender, flat on top, and the owner would have to "sculpt" a crown on the top of the patch to finish it. Very slight crown, so you have to look closely to see it.

The second piece has not been run through the e wheel, as I figured I would try to show how to put some crown into it with a low crown body hammer and a block of wood. We'll see how that goes later today.

I sure hope this turns out good, cause I'm really gonna have egg on my face if it doesn't. There is no finished product yet. You're looking at what I'm looking at when I hang this up, and go back out to the shop.
IMG_2609.jpg
IMG_2610.jpg
IMG_2611.jpg
IMG_2612.jpg
 
And the last two pics for today.
IMG_2613.jpg
IMG_2614.jpg


I pulled these two "dollies" out of my dolly drawer. Homemade for some purpose in the past, can't remember. Just need something roundish to fit inside where the wire edge goes in order to form the sheet metal around the wire edge. The bottom waste will be trimmed off, then I will scribe the overlap on the other end of the patch. Cut it off, put some crown into the patch, then tack it in place. Later.
 
Next up was to cut off the overlap.
IMG_2618.jpg


If you don't happen to have an e wheel, you can use a body hammer with a low crown, and hammer the shape into it on the end grain of a block of wood.
IMG_2617.jpg


I just drew the numbers on there to show you that I hammered moderately in those spots, one hammer blow per number, in that order, just so you can keep track of where you have hammered, and where you have yet to hammer. Only reason for the numbers. I don't draw them on for myself, just go back and forth. That was a total of 32 hammer blows, with that hammer.
IMG_2616.jpg


It put this much crown into it. Doesn't take much, but its way easier to do now than when it is welded in place. There will be lots of planishing blows with a dolly to smooth it perfectly afterwards, but at this stage, you just want to induce a little crown, like the rest of the panel has.

I'll add here that if you do not put crown into the patch first, it will fit on both sides like a bend in the metal, because there is crown in both sides of the fender. When crown is added, both sides will "flow perfectly" with the original piece. Hope that makes sense.
IMG_2619.jpg


Fitting it in place now. I don't have enough deep clamps to do the whole circumference of the weld. Have to fit it for proper welding gap, and straighten out my corners in my cut line, as best I can while maintaining a tiny gap.

Now, I have mentioned this little gap before, and today I decided to measure it. Once this was totally tacked together into one fender, I got out my feeler gauge. The thinnest gaps were about 10 thousandths, most were about 13 thousandths, and that is about the gap I like. The widest were 19 thousandths, and they could become troublesome with the tig, if I'm not careful. Easily burn through that gap.

I also put some masking tape in the spots where the metal is touching, as in, zero gap, which I don't like. More on that later.
 
Last edited:
IMG_2620.jpg
IMG_2621.jpg
IMG_2622.jpg
IMG_2623.jpg


This is what I was referring to as fitting as you spot from one end to the other. Everything must be line up perfectly. First time you do this, if you don't have help, the air might be blue. I use my little 3 inch sander, release a clamp or two, then sand the high spots away so the gap is even, then reclamp.

Spot weld wherever the panels are lined up PERFECTLY. Not just close.
 
IMG_2624.jpg
IMG_2625.jpg
IMG_2626.jpg
IMG_2627.jpg


That "pair" of gloves on the table is what I use to spot panels in with the mig. I use the index finger on my left hand to feel when the panel is PERFECTLY lined up. This particular one is really nice, as its actually 19 gauge, just like the originals from Ford, and I used some of my own 19 gauge stash for the patches, so they line up perfectly inside and out.
I usually work with 18 gauge cold rolled, which I line up on the outside of the panel. Inside will always be a bit of a ridge or ledge, whatever, as 18 is .048 or so thick, and 19 is .043 or so. Works fine as long as you keep it flush on only one side of the sheet.
I'll also add that these fenders are really nice. And the wire is actually a full 3/16 thick. Bigger than anything I have worked on before. I am using more of the same to extend the wire.
 
63285789833__F2DFAD52-B45F-4C4F-B30E-C54904726CEE.jpg
63285792118__7B2FDB61-1EAC-4438-A402-55AE41AB5273.jpg
63285793623__7A2A0C2F-8438-4B01-90FE-B0ED60176459.jpg
63285794921__A9E3AC05-0B75-4247-90D2-5602B0318F9D.jpg


Its a lot slower procedure to spot the second half in place, as it isn't nearly as easy to clamp the whole thing. Thus, the need to line up the tail end perfectly, then work to the other end. It all worked out just fine.
 
I applied some pieces of blue masking tape to the areas where the "fit" was tight, touching both sides. I thought it would raise up to show how the expansion of the metal makes for a lot of distortion. It did, but not enough to show up in a photograph. You'll have to watch that for yourself I guess.

When I weld, I watch and/or feel the metal rising up beneath my torch hand, then lay back down again, as it cools. If its too tight, it just buckles either up or down, and doesn't return to its original resting place. I weld right to left. The passes you will see were done pretty much non stop, except to get more filler rod. I didn't burn any holes through yet. Really nice to weld new steel to new steel.
IMG_2637.jpg
IMG_2638.jpg
IMG_2639.jpg
IMG_2640.jpg
 
IMG_2641.jpg
IMG_2642.jpg
IMG_2643.jpg
IMG_2644.jpg


Here, after welding, there was a little distortion. Keep in mind, these were done non stop. I take care of the warpage and planishing afterwards, which I don't necessarily recommend, unless you know what you're doing.

Its way way easier to correct distortion while you're progressing, so it doesn't get worse, and you know exactly what areas to address, as the newly welded area would be the only place the distortion could originate from. Do not hammer on an area that isn't in the heat affected zone, until you have the heat affected zone pretty much back to where it was before you welded it up.

Your teacher would tell you that there isn't anything wrong with the metal that hasn't been heated up and cooled yet.

I used a low crown hammer again on the inside of the fender, as you're working on an inside radius. I really don't have to say this, do I? On the outside of the fender, you can use a flat faced hammer with a dolly on the inside.

The chunk of railroad rail works really well to pound against. This is where you'll need to use some moderate hammering. The Tig weld is much much softer than any mig weld, and you'll definitely feel the difference between trying to hammer down an "unground weld", after doing a mig weld. Don't hit hard enough that you start to stretch the metal.

You only have to get it straight enough at this stage to more or less get it back to the proper shape. Don't worry too much about smaller imperfections. Lots of hammer and dolly and slapper and dolly work to be done yet.
 
I didn't take any pics while grinding off the uglies. I use a 3 inch grinding wheel to grind the weld down to just above the surface of the parent metal. If you use a really thin grinding wheel, be sure not to drop off the top of the mountain top you are grinding on, as you will make a nice little gouge beside the mountain top with the thin grinding wheel. I'm sure we've all done that.

Don't try to grind in the bottom of a canyon. That is why you did the initial hammer and dolly work a few minutes ago, so there hopefully isn't a valley or canyon where the weld bead lies. Trying to grind in the bottom of a valley, you will inevitably run the grinding wheel into the metal on both sides of the weld, making it look like dog shit.

Knock off all the high spots on the weld bead, both inside and outside the fender. I know that the urge to get lazy is strong, and leave the inside, as it will be covered by whatever you put on the underside of the fender to protect it from rocks and such.

If you do not do this, you will never ever get a decent finish on the panel, as the dolly will never seat on the back side when you go to planish the panel. Head down, ass up, grind the inside. Doesn't have to be pretty, but there shouldn't be any spots on the weld bead higher or thicker than the original parent metal.

IMG_2645.jpg
IMG_2646.jpg
IMG_2647.jpg
IMG_2648.jpg
 
After grinding with the 3 inch wheel, I use a sanding belt to carefully remove the rest of the weld bead.

I'm going to back up here a bit as well. When I grind with the 3 inch wheel, the die grinder its mounted on will spin to the moon. I don't know, maybe 15,000 rpm or something. Pull the trigger all the way open, put on your ear muffs, and get to work. With the trigger wide open, shit will happen very very fast, and you can make a hell of a mess way before coffee time.

The high pitched scream of the grinder in your ears, shit flying past your ears, glazing up your grinding wheel, been there done that.

I use an air reducer attached to the die grinder. I bear down fairly hard on the stone, and I want the stone turning just faster than I can actually see it. You can carve till the cows come home if you do it this way. Turn the air down so when you are grinding, you can stall the grinding wheel if you choose to do so. You can do some really controlled grinding that way.

Did I really need to say that? Yes. Almost everyone I work with does it, just like I used to. Same goes with the belt sander. Keep the speed down also, so you can stall the belt, or almost stall the belt doing the work. You will be amazed at the control you have, cause that bloody little belt sander want to make a little depression every time you stop, while you are changing direction. Try it, you'll like it.


IMG_2651.jpg
IMG_2653 (1).jpg
IMG_2654.jpg
IMG_2655.jpg
 
Looks great.

I'm hoping to have a couple fenders for you to work on in the not to distant future John. My new dually winch truck build!

There will be no fancy body work and paint on this one. I have a pretty good cab, front fenders and hood all in a pretty nice patina. Still need a couple of matching doors or else we are going to have to use parts I have. the doors will not have to match the rest just each other.
 
These seams welded up very nicely with little distortion.

Summary of finish work.

I hammered "on dolly" fairly hard to squish the soft tig weld down, and to get the areas with distortion somewhat flat.

Ground down welds inside and out, just to knock down all the high spots.

More hammer and dolly work to smooth out the panel before finish grinding work can be completed. There was a lot of back and forth hammer and dolly work, grinding, then more hammering, then more grinding, etc. Don't expect to do all hammering, then all grinding. Doesn't work perfectly like that.

Once all the weld bead has been removed inside and out, the slapper and dolly work begins. This is what will really make you smile. Its also easier as far as I'm concerned, than being a sculptor.

There are videos on how to do that. I use a slapper I made from a large mill file.

There has been no need to shrink anything thus far. What you see is all hammer and dolly work. Maybe I just got lucky, but I'm sure not done yet.

I probably will not add much to this thread now. Anything more will be pretty much the same.

After all the slapper work is done and the panel feels perfect, I went over it with a DA sander, just to give it a nicer finish.

After that, I did a few minutes with a vixen file. It just takes it that one step further. How crazy do you want to get with a panel that will be covered with paint and a little filler, I'm sure.
IMG_2654.jpg
IMG_2655.jpg
IMG_2656.jpg