My history working on old cars/hot rods never existed until shortly before retirement. As a kid I built model cars including around 10 -1940 Ford Coupes. So one day I'm online (61 by then), I find a 1940 Ford Coupe hot rod for sale at a car dealers site. Made some initial contact for information and price. My wife had not really said "No Way" but was not too impressed. In fact after a whole afternoon of sporting a long face of disappointment, she said "if you are going to be that miserable, go ahead and buy it". This was a Saturday night around 7PM., but I had the salesman's home number. Dialed him up and bought it before my wife changed her mind (lol). A whole new world opened up. An old car draws kindred spirits like a moth to a flame. My social world exploded. Most of my new friends were working on "projects". So a couple of years later a 1938 Ford Standard Sedan, cut up to make a pk-up, came up for sale. My initial thought was to use the front sheet metal and the front of the cab plus my wood shop to build a "woody wagon". Plans for woody wagon construction are closely held or nonexistent. So not wanting to build a vehicle ICBC may not approve of, my wife suggested I try find another 1938 car body. So here leads into my 1938 std/dlx. I found another body, a 1938 Ford Deluxe Sedan.

Navigation
Install the app
How to install the app on iOS
Follow along with the video below to see how to install our site as a web app on your home screen.

Note: This feature currently requires accessing the site using the built-in Safari browser.
More options
You are using an out of date browser. It may not display this or other websites correctly.
You should upgrade or use an alternative browser.
You should upgrade or use an alternative browser.
1938 Ford Sedan
- Thread starter 38 std/dlx
- Start date
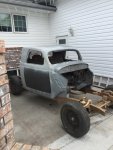
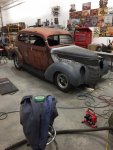
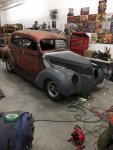
My project has proceeded for six years and is 1938 Standard sheet metal fitted to a 1938 Deluxe body. Both the original standard frame as well as the deluxe frames needed a lot of "work" to be a good foundation. So, in my last year before retirement I invested in a Fat Man Fabrications frame. Heavy duty style front end,power rack in place, 9 inch Ford rear, 4 wheel disc brakes and the plumbing already run. Used a 2x6 home made lifting rack to lift the body from the old frame and lower to the new one. The body was lifted umpteen times from the frame during the course of the build. Refurbished an old home built rotisserie to aid in the build as well.
Attachments

Interesting story. Keep it coming
The standard body had all the front sheet metal, the Deluxe was missing the hood aprons but had the fenders, grille and hood. Side hood aprons go for high prices and most are junk. While jumping through the Internet bumped into a blog by a guy specializing in 1938 Ford sedans. His disclaimer stated that the standard was basically a 37 body and the deluxe was basically a 39 body so parts interchange would not work in a combination car. Went out to my Shop. On the Deluxe firewall there were three holes per side to attach the Deluxe hood aprons (which I did not have) but there was a fourth hole pad (not drilled) which perfectly supported the Standard hood aprons. So using the whole front end Standard sheet metal I added it onto the Deluxe body. It fit. Used the standard running boards as well. The Deluxe rear fenders needed two running board holes redrilled to fit. So my Standard/Deluxe 1938 Ford Sedan was born.
Attachments

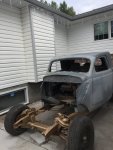
The front floor pan was in bad shape as well as the package tray area in the trunk. There were some rusty areas in the rear seat upper trunk floor that needed some care as well. I bought a Mig welder and traded off some Shop construction labour for welding lessons. Don’t get me wrong. My welding consisted of installing square tube support bracing in the body and then the spot welding the replacement floor into place. Having had a knee replaced ( so you cannot kneel on it) and being a larger guy I wish I had a video of my antics installing said new floors. Turning in circles, keeping one leg straight and banging into the x bracing provided a lot of blue air. Going into the house after to wash up, the face in the mirror looked like commando camouflage with all the soot lines from the x bracing.
The Deluxe 1938 tool tray area that was rusted badly, had a curved area between the gas tank area and the tool tray. Used a piece of fencing pipe to rough shape the replacement piece but holding it into place and tacking it in was nigh impossible. Ended up using the pipe itself, tapped into the opening with the sheet metal curved around it. Welded the curved sheet metal into place then popped the pipe back out. Worked like a hot dam.
With the floors replaced and patched I moved on to the body parts. The front fenders had been patched and repaired but had to do some tweaking to smooth them out, so a little hammer and dolly work. Rear fenders needed some patch and replace repairs but not too challenging. The only area on the body that needed attention were the rear bumper bracket exit areas. Probably took me as long to complete as some of the other build threads on this site do a complete fender rebuild.
The front hood aprons looked Ok until I started prepping for paint. The long rails were bondo queens. Being stamped metal from long ago and available “others” in like condition had to come up with a solution. Looked at replacing the original rails with round stock but did not look right. Ended up using flat bar with the top outer edge rounded over. A metal form to match the required curve was made with holes drilled through along the length. The flat bar was heated then bent and pinned in the form. The end result matches the original rails. The cost of milling the excess flat bar away was too expensive. Probably added 50 pounds weight to the front end so won’t be doing any wheel stands.

 lol
lol
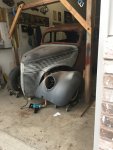
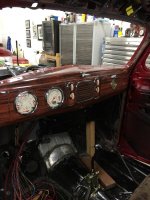
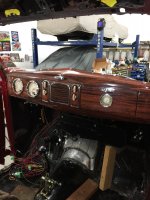
The engine is a rebuilt 350 Chev block with a 700 R tranny. When ordering the frame from Fat Man they recommended narrowing the front end by 2 inches so a wider choice of wheels could be added under the front fenders. With that choice being made a Chev block became necessary to allow the power steering room to fit (therefore no Ford in a Ford). First image old set up, second engine in finished dress.
The engine is a rebuilt 350 Chev block with a 700 R tranny. When ordering the frame from Fat Man they recommended narrowing the front end by 2 inches so a wider choice of wheels could be added under the front fenders. With that choice being made a Chev block became necessary to allow the power steering room to fit (therefore no Ford in a Ford). First image old set up, second engine in finished dress.
For three or four years not including this past Covid disaster my wife and I travelled into the States for car parts. We stayed with friends in Abbotsford then crossed the border to pick up my wife’s quilt addiction and my car parts. Used a drop box in Sumas Washington for purchased parts and picked up others at Swap meets in Monroe. We would cross the border early in the morning, return two days later, drop parts with our Abbotsford friends, then right back across the border for another load. That way we could max out our duty free purchases amount ($800 apiece). We found a great hotel at reasonable cost in Bellingham. Initially I priced out ordering the parts through Canadian suppliers and/or extra shipping cost directly from the States. Cost of travel, food and accommodation was easily covered just in savings on GST/PST let alone shipping and cost of goods in Canada.
All the parts and pieces now on hand it has been an assembly job for the past few years. Thank goodness for my “rodder” friends that point me in the right direction and help me along the way. I return the favour by building consoles, garages, cupboards etc. in return.
The result is not “perfect” but will be a nice ride. Lining up more pictures, will post shortly.
")
37 is my favourite year but why do some 38s have that beautiful 37 swept back grill also ?
Shaune one is a standard and the other is deluxe.
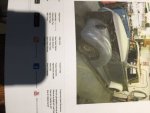
With the parts I had on hand between the two different bodies everything has worked out fine. Personally I prefer the standard front end and really like the deluxe rounded slant rear. My wife liked the look of the bump back trunk on the 38 standard. I did not and being it was long gone, did not have to convince her otherwise. My 40 Ford Coupe does not have the dividing bar in the windshield, just two pieces of flat glass meeting in the middle. I bought a one piece curved windshield for the 38. Therefore, although not installed yet, you can see how the car will appear once it is installed. The standard front end is not going to have all the chrome as in the picture in the above post. Mine will have the hood ornament and center grille strip.
Thanks for the above pictures Bash.
Thanks for the above pictures Bash.
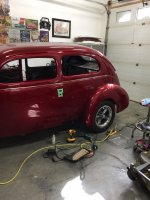
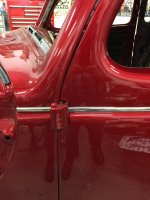
Picture of the painted car. Close up showing the trim. The trim that came with the car was damaged and hood trim on ebay was too expensive and in ratty condition. The small cowl pieces were nonexistent. Went online and found mcmillanrodandcustoms.com, 715-387-6847 that make trim pieces using thin rounded edge stainless steel. Sent down a drawing showing the trim clip location holes and they made the pieces. Instead of spring clips the trim has small bolts that go through the holes. Had to drill small access holes on the inside door structure to put on the nuts. More work than I thought going into it but the results are worth it. Think the difficulty would depend on the car itself as others may have more open access space. As the picture shows, very shiny and bright so could not be used with original 1930's trim. The package was not cheap but after pricing out ebay pieces, refurbishing and non-availability of key pieces, I saved money and time.
Attachments
Early during the first Covid lock down, contacted Fix Auto. With the drop in ICBC claims they welcomed "other" work. A friend of Gord Jarabek's followed me in line, then Gord himself with his Merc pk-up. Gord just has the box and its cover to do around mid month.
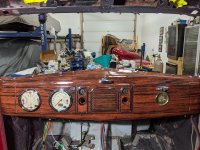
My 40 Coupe came with an after market dash. A lot of the old cars had wood grained dashes and if I am building from scratch why not. Located a guy in Puyallup Washington and had him do my dash and window garnishes. The knobs in the middle of the dash used to be for throttle, choke, cigar lighter and ashtray. I had two backings for the driver's side, so eliminated the ashtray. All the knobs are nonfunctional but there for the original look. The clock is the original wind up, still works.
Attachments
That looks awesome! Nice idea.
