|
Lifting the Trunk Lid / Lining the Trunk
|
|
|
Text
and photos by Bob Klowak
|
|
|
Well
we are a little behind with Xmas and the Norwalk Virus - i.e our project
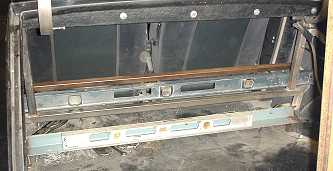
came to a halt. We're are back at it now. The trunk needed a support
for the floor and a method to open the trunk. We tried everything from
torsion springs to hydraulic cylinders but none worked due to the flexibility
of the hinges |
 |
 |
Since we had an abundance of 2"x 2" x 3/16" angle iron, cutting and fitting was easy, making sure the floor was flat and even. Removal of the latch and striker was necessary. Later, I will glass in the holes. |
|
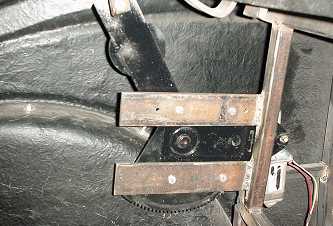
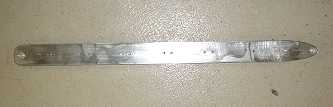
Since lifting the trunk lid didn't affect the hinges, this was my only way. Two 9" x 2" x 3/16" flat bars were used to support the motor assembly. John Crust, who by the way inspired me to build my own frame, donated the assembly. John built a 34 Ford some year's back and had built his own frame. His project right now is a 1932 Roadster. I will try and get some photos of the build. He is truly a craftsman. This motor assembly I was told was from an International truck. I believe it was a window operator. Its travel was about 18" in its arc. |
 |
 |
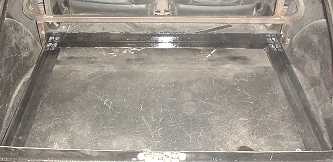
After the motor was installed and working, the floor was cut out of ½ " plywood. This doesn't have to be #1 grade, as it will be covered with upholstery. The floor was the first to be installed. |
|
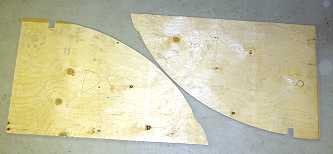
Then the sides were cut out of the same material. This part was a little more difficult to cut out. I used a compass following the contours of the trunk lip to get it in the ballpark and then kept sanding the edges till it fit. This took a while. |
 |
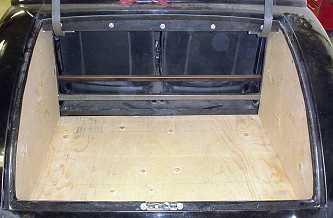 |
The sides were fitted and the trunk began to take shape. The back panel will have to be removable since the battery and various things like relays; amps for the stereo and other goodies will be in the false area between the trunk and seats. |
| The
rear panel was cut and fitted. Now it's looking good. I hope when its
car show time and I have this on the road that I will be able to get everything
we take into the trunk. I don't think back in 34 that they were thinking
of us and all the space we need for our electric coolers, tents and chairs
and the abundance of polishing equipment. |
 |
 |
Now the hard part was to create the arc in the side panel. I hooked up the motor and a switch to my power supply and then put a pencil through the hole in the end of the arm on the motor assembly and started the motor and pressed the pencil so it scribed a line on the back side of the panel. I did this back and forth a few times to get a good mark on the backside. Then two holes were drilled at both ends. A jigsaw finished it up. A bolt was inserted in from the trunk side and the motor moved back and forth to see if anything was binding. It ran in its track perfect the first time. |
| I had some ½" aluminum left over from the hood braces so an arm was cut out and scribed, holes drilled. It was hand filed. Boy would a milling machine come in handy now. |
 |
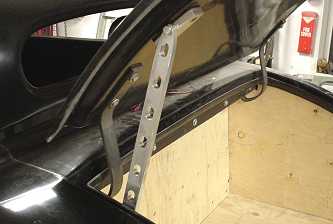 |
Another small piece was cut for the trunk and a matching plate drilled and tapped was put on the other side. There is a 5" hole in the center of the trunk lid were you could gain entry. The arm was installed. The motor was tried out and some fine-tuning will be needed when the lid is closed and after the trunk rubbers are installed. After making the lift arm the hinges are not so pretty. What do you think, back to the metal mart for more aluminum? |
|
|
|
|
Copyright
© 2001-2002
canadianrodder.com/eFX Design
|
|